Original Post : Matt Allington, 24 Apr 2018
Background
Technically you don’t need calendar tables to use Power BI, but for most reports that go beyond a simple Excel spreadsheet analysis, Calendars are an essential component of a successful Semantic Model. There are many different approaches to creating and maintaining a Calendar table for your model, but I believe Power Query is the best tool to solve this problem (and so does Jeffrey Wang (reference)).  As a result, I have decided to provide this Hitchhikers Guide to the Power BI Calendar.
Matt originally posted about this idea many years ago over at PowerPivotPro.com and then provided the original how-to guide here in 2018. I have learnt a lot about Power Query and specifically what makes a good Calendar table since that time, plus Power Query has come along in leaps and bounds, and it now has a lot more capability than it had previously. Today I am going to write a revision of this post showing you how to create a calendar table in Power Query. Once you know how to build a query like this, you can copy and paste the code for it into a text storage tool (like OneNote or Notepad) and reuse it over and over for all of your data models – very cool. Plus you just might learn a few new Power Query tricks along the way.
The UI is Your Friend
Sure, you can do more when you can code in M directly, but one of Power Query’s greatest strengths is you don’t need to be a programmer to achieve amazing things with your data preparation. As a result, my approach to teaching people to use Power Query is to always use the UI where possible. I first use the UI to do the hard work, then jump in and make small changes to the code created by the UI to meet any specific variations required. Keep this concept in mind as you read this article.
To teach you how to create a calendar (dates) table in Power Query, I am going to use Power BI Desktop, but of course Power Query for Excel or Dataflows online will work just as well and the process is identical. In fact the calendar query at the end can easily be cut and pasted into your tool of choice, but if you jump straight to the end, you miss a great opportunity to expand your learning.
Let’s begin.
Step 1: Create a list of dates
Starting with a blank Power BI report, to create a calendar table in Power Query, I’m going to begin by creating a blank query. Navigate to the Home ribbon, select the dropdown list for Get Data, and then select Blank Query. This simply creates a new query with no data in it, and importantly no data source.
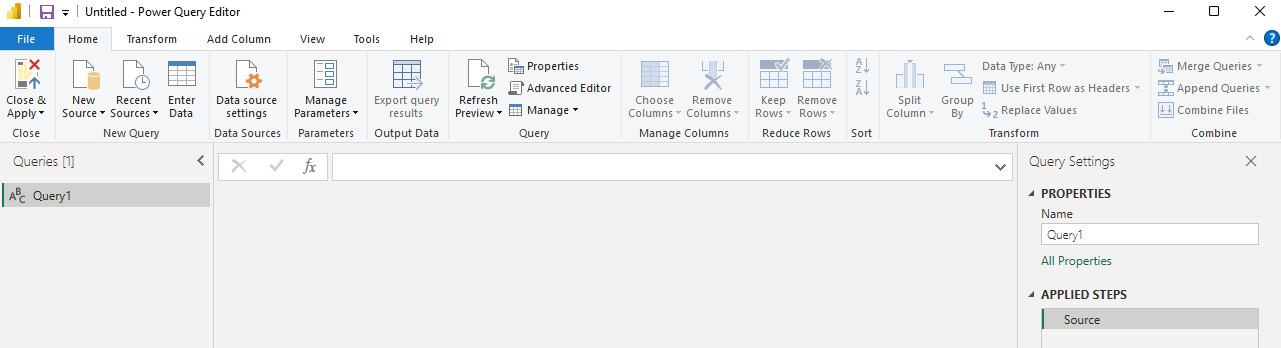
Let’s rename the query and give it the better name, “Dates” or “Calendar” if you prefer.
Note: “Calendar” is a reserved word in DAX, which means your table will be identified as ‘Calendar’ in your DAX formulas. There are no issues with this, just something to be aware of. 
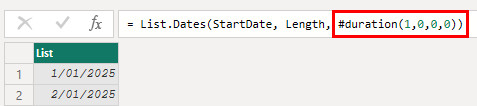
Next, we’ll need a list of dates to build the calendar from. In the formula bar of your query, call the function List.Dates into the formula bar without any parameters (and no brackets) as you can see below.
- If you can’t see the formula bar, you can turn it on in the View ribbon.
- Be aware that the M language is case sensitive, so list.dates will not work – you must type in List.Dates¹
Now of course you need to “know” that this formula exists to be able to use it – but now you know, so you can use it to create your calendar table in Power Query.
¹ Note: M Intellisense was made generally available to Power Query in April 2019, and has made formula writing significantly easier
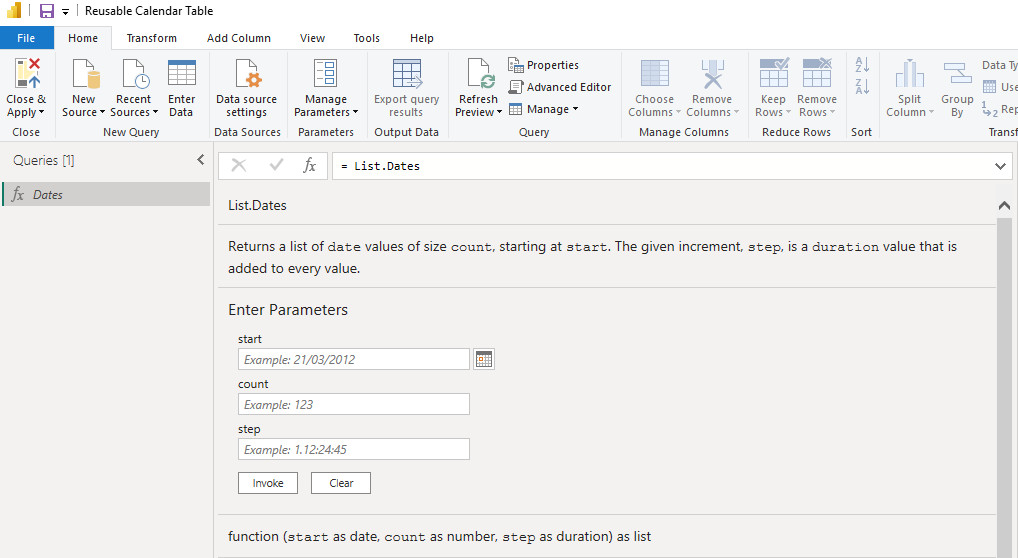
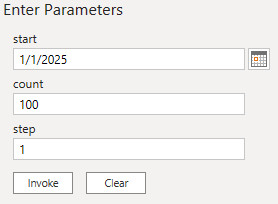
The M language is self-documenting. As you can see in the image above, when you enter the function name without any parameters and without the brackets, the UI will display the documentation that shows you how to use the function. To take advantage of this function, we simply need to fill in the required parameters. The values I entered into the parameters wizard can be seen in the image that follows, then click the button to invoke the function.
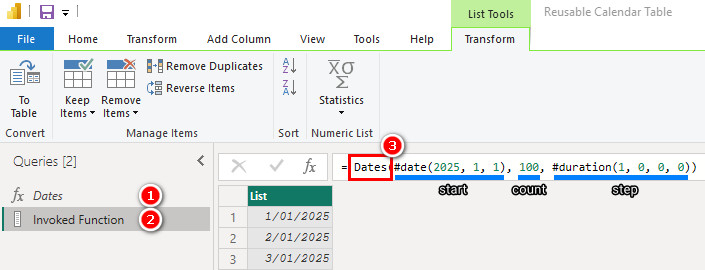
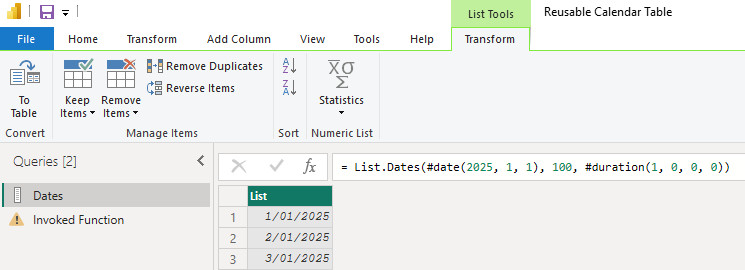
After doing this, something strange happened. A new query was created (two below) and this new query passes the parameters to the first query (shown in 3 below). Let me explain this further.
The first Query (shown as 1 below) Dates has 1 line:
= List.Dates
The second Query (shown as 2 below) called Invoked Function also has 1 line:
= Dates(#date(2025, 1, 1), 100, #duration(1, 0, 0, 0))
As you can see in the code above, the second query is simply passing the set of parameters (highlighted in blue below) to the first query, which is the function itself. This can be simplified by passing the parameters directly to the function itself. The word Dates in the formula below (3) is therefore not a function, but a reference to the Dates query that contains the name of the function (1).
Copy the code between the brackets (…….) from the Invoked Function query (2 above) and paste this into the source step of the Dates query (1 above) as shown below.
Having done this, you will notice that The Invoked Function query is in error. That is fine, we’re now calling the function directly in the Dates query, so the Invoked Function query is no longer required, and can be deleted.
Note: The benefit of invoking the function is that it manages all the syntax and parameters automatically for you using the UI wizard – much easier than typing this all in by hand, but now that you know how the List.Dates function works, you have the choice to provide the parameters directly in future if you prefer.
At this point, our calendar is a single query, with a single Source step. Next we need to perform the following steps:
- Convert the “list” into a “table” using the “To Table” button in the List Tools ribbon.
- Double-click on “Column1” and rename to “Date”.
- Change the data type to Date.
We now have a Date column that spans 100 days from January 1, 2025.
Step 2: Allow The User to Set the Start Date and End Date
I want this to be a reusable Calendar table, and that implies that I will want different start dates for different uses. Also I want this calendar table to “grow” over time so I don’t have to keep setting a new end date. I refer you back to the formula in the source step above:
= List.Dates(#date(2025, 1, 1), 100, #duration(1, 0, 0, 0))
Note that the start date is currently hard coded as 1/1/2025 and the calendar is set to load 100 days. Below I will show you how to make the start date easier to maintain and the end date automatically set to the end of the year from the current date.
Start Date
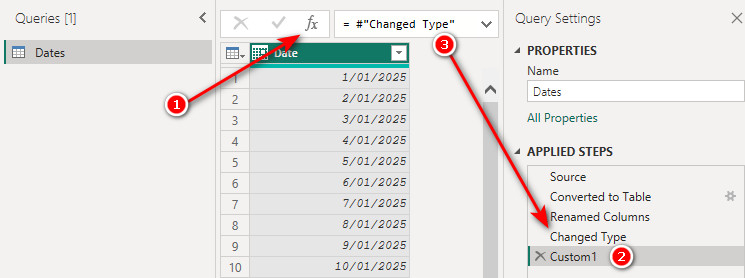
To the left of the formula bar, click the ƒx (Add Step) button (1 below). This added a new step called Custom1 (2 below). Note how this new step automatically references the previous step (3). This is the default, but it doesn’t have to be this way.
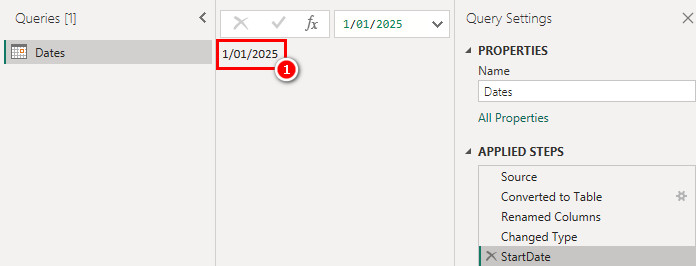
Replace the entire code in the formula bar (including the = sign) with the date you want your calendar to start with (1/1/2025 in this case). Right-click on the Custom1 applied step and rename it StartDate. Note there is no equals sign used, just the date entered as 1/1/2025. This new step called StartDate is a hard coded step in the query that stores the required start date as a scalar value. You can tell it is a scalar value because the results pane (preview window) below the Formula Bar is displaying the scalar value, not a table (1 below).
Note : It is possible to use a parameter instead of a custom step, but this would create an additional query, and our goal is to produce a calendar that can be generated from a single query
This new step StartDate can be referenced from inside any other step in the query. Return to the Source step, and replace the originally hard coded date with the reference to the StartDate step as shown below.
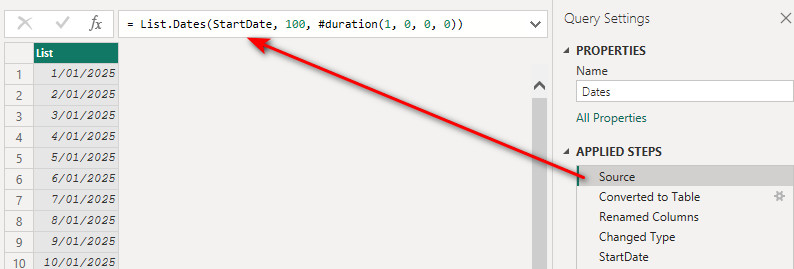
The query still works of course. Note that the Source step is now referring to the StartDate step, yet the StartDate step doesn’t appear until way down the list of steps. This is perfectly fine in the M language – the steps do not have to be executed in a linear order.
End Date (Length of Calendar)
Looking back at our original function List.Dates, you will note that the first parameter asks for the Start date, but the function does not ask for an end date for the calendar. Instead, we have to specify how many periods (days in this case) the calendar should run for. I want my calendar to run up to the end of the current year, and when we cross over to next year, the calendar will need to automatically update to the end of next year. This implies I have to find out the current year’s last day dynamically, to do this we will rely on today’s date. Once we have discovered the last day of what ever year we are in, we will then subtract the StartDate value from it, and hence calculate how many days are required in the calendar.
Return to the StartDate applied step, and add a new custom step by clicking the ƒx button again. Replace the formula with the M function DateTime.LocalNow without any parameters. (remember, if you just type the function name, the documentation will appear.

From the documentation provided by Power Query, we can see that there are no parameters required for this function. It should be noted however, that when invoked, the function acquires the date and time from the machine running the instance of Power Query. While we are working in Power BI Desktop, that is fine, the local machine’s time is right now, but if you intend to publish this calendar into the Power BI Service as part of a report’s Semantic Model, the date and time will be sourced from the cloud-server machine refreshing the data, and the Power BI Service’ time is Coordinated Universal Time (UTC) which for me is -10 hours of the current day time. To compensate for this, we will set and adjust our time based on UTC, that way it will always be correct, irrespective of local or service refresh.
Replace the function in the formula bar with the DateTimeZone.UtcNow function instead.
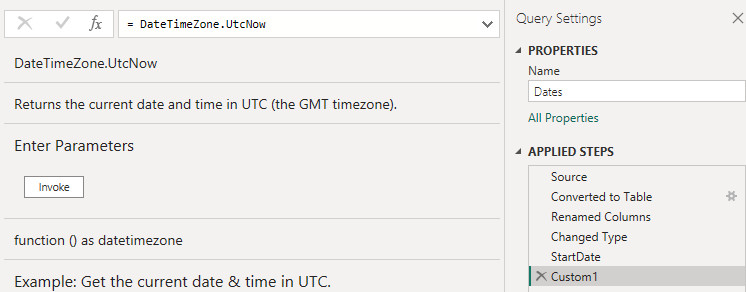
Now, simply add open-close parentheses () to the end of the function to return the current date/time. You can see once again that this is a scalar value (not a table) because you can “see” the value below the formula bar, however you will note that it is returning the time in UTC not the current local time. You will also note that the date time value has a +00:00 at the end. This is because this is actually a date time zone value, and because of this we are able to convert it to our local time with a special function called DateTimeZone.SwitchZone.

Replace the DateTimeZone.UtcNow() with DateTimeZone.SwitchZone to discover what this function does.

The DateTimeZone.SwitchZone funtion allows 3 parameters. The first parameter is the date time zone you wish to change, the second is how many hours do you wish to shift, and the 3rd is how many minutes do you wish to shift. As I am based in Brisbane, Australia I have a local time zone of UTC + 10, so I will simply update my code as follows2.
= DateTimeZone.SwitchZone( DateTimeZone.UtcNow(), 10)
2 Note: Brisbane is the capital city of Queensland, and Queensland is unusual in that we do not implement a Daylight Savings time shift during summer, so the above code is infact sufficient for always returning the current date time in Brisbane, but most people live in a region where Daylight Savings is applied, and thus this formula is insufficient. For those of you who need a Daylight Savings sensitive time capture, a significantly more complex formula will be required. I will address solving this when we have a couple more tools at our disposal.
We now have the current date time in our local date time.

The next problem is that this is Date/Time format, but we need Date format. To solve this, wrap a Date.From() function around the code to extract the date portion (shown below), then rename this step “Today”. Each time the query is refreshed, this step will automatically update to reflect the current date.

We now have a hardcoded StartDate, and a dynamic ability to detect today’s date. To calculate how long our calendar should run for we will need to first determine when our calendar should end. If you would like your calendar to end at the current date, you can skip this next task. If you would like your calendar to have the ability to also handle future dates, we will need to assign an appropriate end date. I am going to set the end date as the last day of the current year.
Add a new step and wrap the formula as follows. Also, rename the step EndDate.
= Date.EndOfYear( Date.AddYears( Today, 0) )
You may notice in the formula there are actually two functions wrapping Today. The Date.EndOfYear is providing the last day of the year of the date provided. The Date.AddYears is allowing the ability to shift your calendar further than this year if necessary. For example, if I wanted the end of next year, I could simply replace the 0 with 1, and then the date would become 31/12/2026.

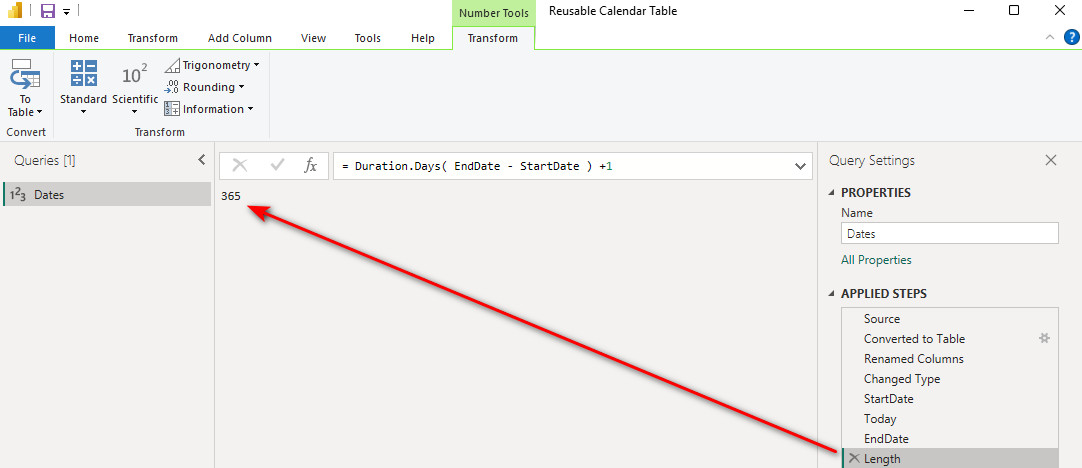
Next, add a new step and subtract StartDate from the EndDate3 to get the duration.
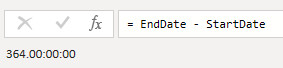
3 Note: If you chose to end your calendar at Today, use Today in place of EndDate
Just by looking at the output above, you can see that there is some strange data format returned. This data is in the format DDD.HH:MM:SS. To determine the run length of the calendar, we need to add this number of days to the StartDate, but this “duration” format won’t currently work. This is because the StartDate is type date, but this new Custom1 step is type duration, so first we need to extract an integer portion of the duration, so it contains just the number of days. This can be achieved by wrapping the formula in a function called Duration.Days below.
Here is the new code4. I also renamed this step to “Length”. You can see in the image below that this is now an integer value.
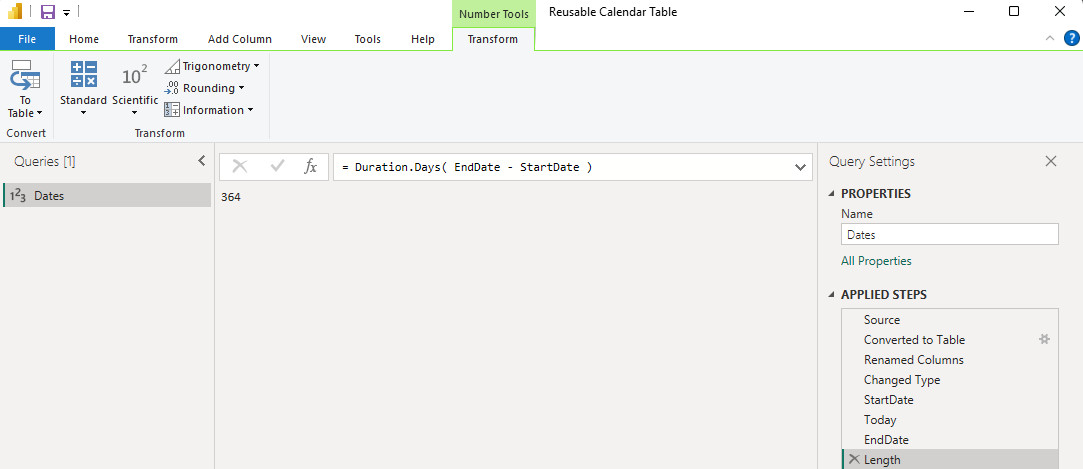
4 Note: Actually, this code will grow up to the 30th of December (or yesterday’s date if you are using Today). You can simply add +1 after the close bracket to make it grow up to and including the EndDate.
We now have all of the parameters we need to build our dynamic calendar table. Return to the Source step to change the first line of code to use the Length instead of the hard coded 100 days. You can see the final version of the Source step below.
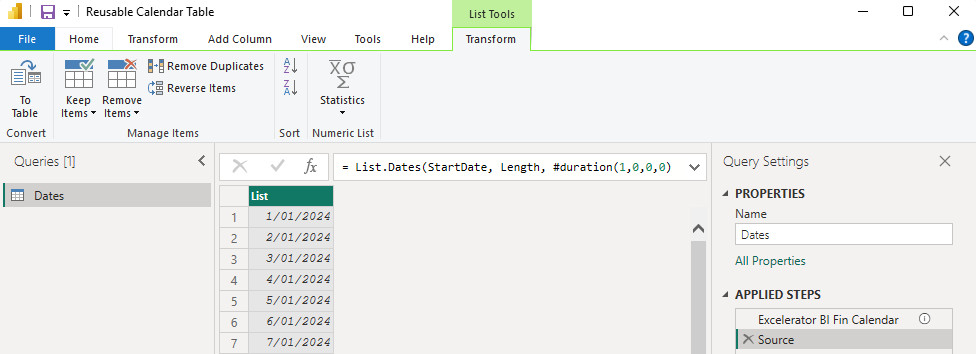
Great. Now the user can manually change the StartDate step to any date, and the calendar will auto grow in length up to our specified EndDate.

Step 3: Build out the Calendar
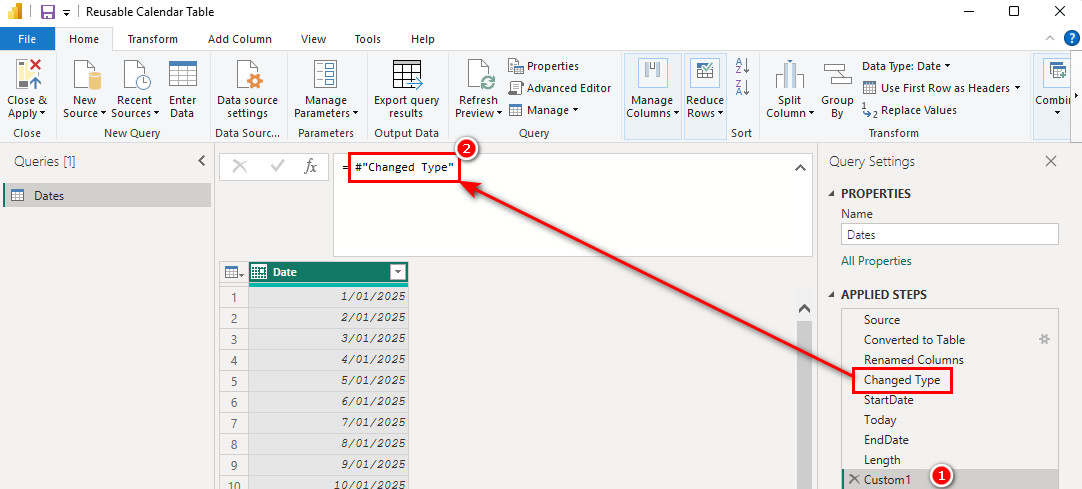
Most of the hard work needed to create a calendar table in power query is already done. Time to add the columns needed in the calendar. Return to the last step in the query (Length) – “Houston, we have a problem”. Note below that all I have on the screen now is the length of the calendar. But I need “the calendar”, not “the length of the calendar”.
This is an easy fix. Remember I said above that the steps don’t have to flow in order.
Begin by adding a new custom step, then change the code to refer to the last step that actually showed the calendar. This new custom step (1 below) “reaches back” up the query steps and “grabs” the calendar in the state that it last existed (2 below) and makes it the last step again.
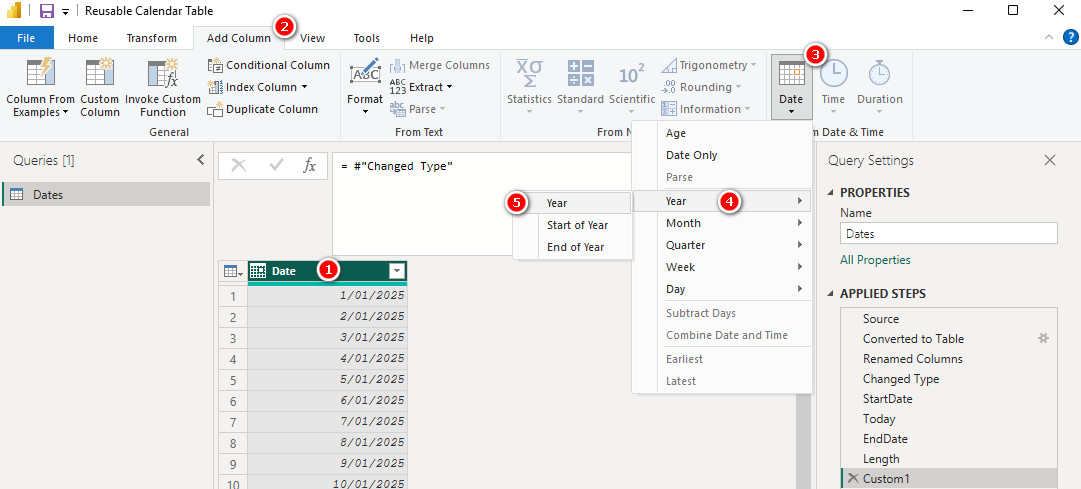
Add the Year
To add the year, click on the Date column (1), selected Add Column (2), Date (3), Year (4), Year (5).
What About Financial Year?
The default year column is calendar year. But many companies have a financial (or fiscal) year. In Australia at least, most companies have a financial year starting on 1 July. Here is a neat trick I learnt from Matt. The trick is to add 184 days to the date before extracting the year – it always works as long as your financial year starts on 1 July.
When I tried to do this the first time in the code, I got an error.
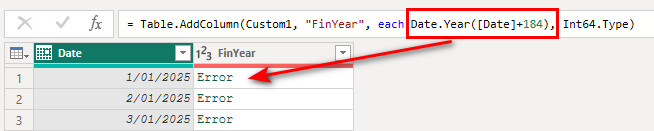
The reason is because you can’t add an integer to a date in Power Query like you can in Excel. But if you take a look back at the first step (Source) again, you will see the syntax that is needed.
Power Query will only add the days after they are converted to a “duration”. When I made this change, it worked for me as you can see below.

My new code (1 above) correctly calculates the financial year (shown in 2). Note I also changed the default column name to “Fin Year” to avoid confusion with calendar year.
Add Other Columns
You can repeat the process of adding as many other columns you like, including Month Name, Month Number etc (using Add Column\Date from the menu). I have done this in my Power Query calendar table but haven’t shown the steps in this article. You can do this now or wait till we bring it all together at the end. There are still a few extra transformations I would like to bring to your attention before we complete the calendar.
M Language Hacks
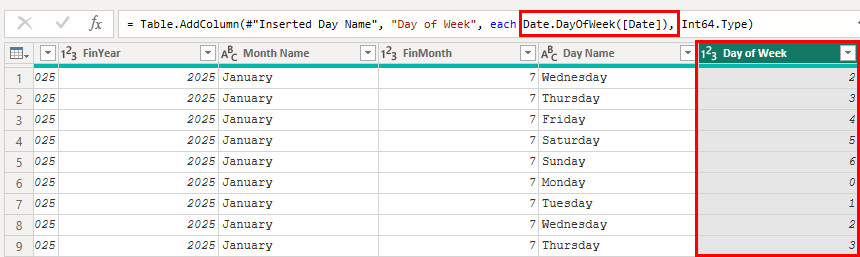
As you have already seen, I like to hack the code automatically generated by Power Query using the formula bar. Below is a good example. When I added the day number of week, the days were listed as 0 – 6 (Power Query uses a zero based index system). I prefer to have the days of week numbered 1 through 7, and optimally I like Monday to be day 1. I could add a new step, add 1 to this column and then delete the original column, but this is a bit messy and adds unnecessary steps. And this is easy to fix by hacking the code using the formula bar. This is what the UI produces (below).
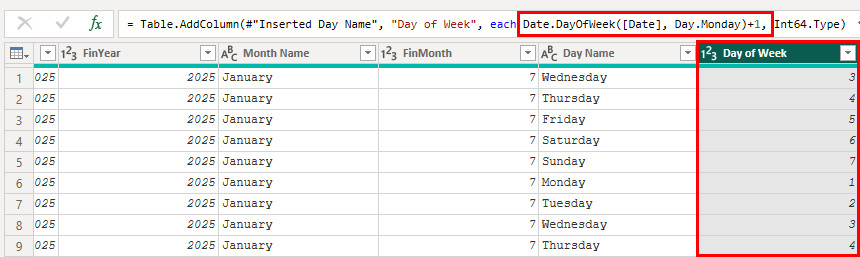
So to make the change, adjust the formula in the formula bar as follows. Remove the close bracket of Date.DayOfWeek (between [Date] and comma). Then, after the comma following the [Date], add “Day.Monday)+1,”. This will change the day numbers to start at 1, with Monday being the first day.
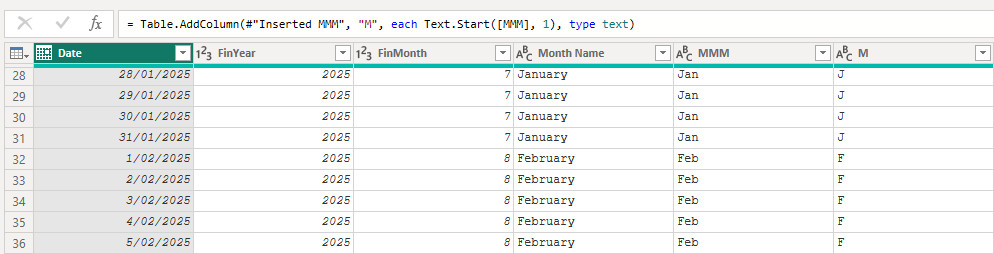
Working with Single Letter Names
When we finally load this calendar into Power BI, we will discover that any of our named columns, such as Month Name, will sort alphabetically by default. This is the main reason to create the numbered columns, like FinMonth. The FinMonth column can be used to override the natural sort order and present the month names in appropriate chronological order. You can read more about this on Power BI Calendar Tables post.
Providing we are working with unique names this works fine, but if we need to load just the first character of a name, the normal sorting behavior will not work because there is no longer a 1:1 match between the text:number values.
i.e.
Months = J F M A M J J A S O N D
Days = M T W T F S S
To overcome this problem, we need to make sure each initial is unique, and this can be achieved by taking advantage of non-printable characters.
A non-printable character is a character that does not represent a visible symbol or number in text but is used for formatting or control purposes in computing. Examples include line breaks, tabs, and carriage returns, which affect how text is displayed or processed but do not appear in the printed output. These characters are essential for controlling the behavior of programs and formatting documents.
The HTML Unicode Character 8203, Zero Width Space, will enable us to make each name initial unique.
Start by extracting the 1st character from a named column.
This however will not create unique text values, so to overcome this challenge, update the formula with the following additional code.
& Text.Repeat(Character.FromNumber(8203), [Sorting Column])
Note: replace [Sorting Column] with the name of the column that contains your sort order.
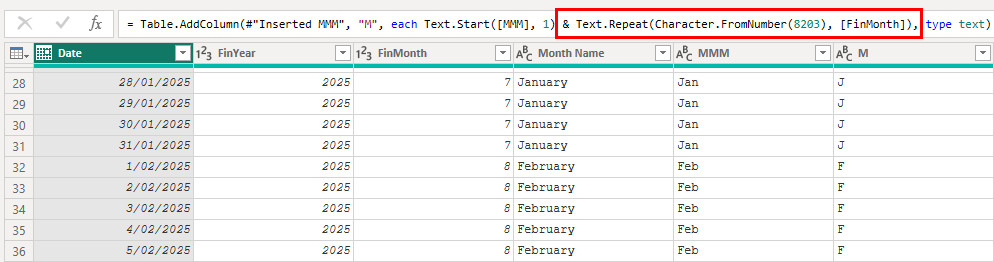
The column will now sort correctly when the data is loaded into Power BI, and because we used the Zero Width Space character, there will be no visible impact on the presentation of the values when the initial column is used in a visual.
So at this point, this is the calendar I have built containing 10 columns in all.

YYMM Column
There are many other columns you will need over time, but today is about creating a basic calendar that gets us started, and there are still a couple of really important columns missing from our calendar. The next column we need is a period identifier, that can be used for identifying each unique month.

This column was achieved by combining a few different transformation approaches, but given the length of this post already, I will just provide the final code. You can start by adding a new custom step, and then paste this code into the formula bar.
= Table.AddColumn(#"Inserted D Day", "YYMM", each Text.End(Text.From([Date], "en-AU"), 2) & Text.PadStart( Text.BeforeDelimiter(Text.From([Date], "en-AU"), "/") , 2, "0"), Int64.Type)
I always start with a YYMM column because it is a number, but often I will further expand the calendar to include an MMMYY column as well, as the former will sort in the correct chronological order without the need of a sort column. The YYMM and “human readable” MMMYY columns are great for visual filtering but are no good to use in solving time intelligence calculations.

ID Columns
The final column(s) we need to create a basic calendar table that will be sufficient for working effectively with DAX in Power BI, is the ever-important ID column. The MonthID column simply provides a unique number for every YYMM in the calendar, and that in turn supports straight forward creation of custom time intelligence formulas. Matt has covered time intelligence in detail here. The YYMM column is not useful for time intelligence because the gap between each number is not evenly spaced, therefore movement around the calendar cannot be achieved with simple addition or subtraction. eg 2511, 2512, 2601, 2602…
I therefore added an integer based ID column to identify each month over all time. This new column starts at 1 and increases by 1 forever.
= Table.AddColumn(#"Inserted MMMYY", "MonthID", each (Date.Year([Date]) - Date.Year(StartDate))*12 + Date.Month([Date]))
Copy the Code to Reuse the Power Query calendar table
Now the calendar is done, it is just a matter of copying the code and saving it somewhere so it can be reused later. I keep mine as a saved text file from Notepad and just copy and paste it when needed. Just go to the Advanced Editor, copy the code and paste it somewhere for later. Here is my code below. Feel free to copy mine and use it in another Power Query Calendar Table if you like.
Financial Year Calendar
let
/*
Excelerator BI a division of Agile Insights
** www.xbi.com.au
**This Calendar was created and provided by Jason Cockington
**This can be freely shared as long as this text comment is retained.**
*/
#"Excelerator BI Fin Calendar" = "",
Source = List.Dates(StartDate, Length, #duration(1,0,0,0)),
StartDate = #date(2024, 1, 1),
Length = Duration.Days( EndDate - StartDate ) +1,
Today = Date.From( DateTimeZone.SwitchZone( DateTimeZone.UtcNow(), 10) ),
EndDate = Date.EndOfYear( Date.AddYears( Today, 0) ),
#"Converted to Table" = Table.FromList(Source, Splitter.SplitByNothing(), null, null, ExtraValues.Error),
#"Renamed Columns" = Table.RenameColumns(#"Converted to Table",{{"Column1", "Date"}}),
#"Inserted FinYear" = Table.AddColumn(#"Renamed Columns", "FinYear", each Date.Year([Date]+#duration(184,0,0,0)), Int64.Type),
#"Inserted Month" = Table.AddColumn(#"Inserted FinYear", "FinMonth", each if Date.Month([Date]) >=7 then Date.Month([Date])-6 else Date.Month([Date])+6 , Int64.Type),
#"Inserted Month Name" = Table.AddColumn(#"Inserted Month", "Month Name", each Date.MonthName([Date]), type text),
#"Inserted MMM" = Table.AddColumn(#"Inserted Month Name", "MMM", each Text.Start([Month Name], 3), type text),
#"Inserted M Month" = Table.AddColumn(#"Inserted MMM", "M", each Text.Start([MMM], 1) & Text.Repeat(Character.FromNumber(8203), [FinMonth]), type text),
#"Inserted Day of Week" = Table.AddColumn(#"Inserted M Month", "Day of Week", each Date.DayOfWeek([Date], Day.Monday)+1, Int64.Type),
#"Inserted Day Name" = Table.AddColumn(#"Inserted Day of Week", "Day Name", each Date.DayOfWeekName([Date]), type text),
#"Inserted DDD" = Table.AddColumn(#"Inserted Day Name", "DDD", each Text.Start([Day Name], 3), type text),
#"Inserted D Day" = Table.AddColumn(#"Inserted DDD", "D", each Text.Start([DDD], 1) & Text.Repeat(Character.FromNumber(8203), [Day of Week]), type text),
#"Inserted FYMM" = Table.AddColumn(#"Inserted D Day", "FYMM", each Text.End(Text.From([FinYear], "en-AU"), 2) & Text.PadStart( Text.From( [FinMonth] ) , 2, "0"), Int64.Type),
#"Inserted MMMYY" = Table.AddColumn(#"Inserted FYMM", "MMMYY", each Text.Combine({[MMM], Text.End(Text.From([FinYear], "en-AU"), 2)}), type text),
#"Added MonthID" = Table.AddColumn(#"Inserted MMMYY", "MonthID", each (Date.Year([Date]) - Date.Year(StartDate))*12 + Date.Month([Date])),
#"Changed Type" = Table.TransformColumnTypes(#"Added MonthID",{{"Date", type date}, {"FinYear", Int64.Type}, {"FinMonth", Int64.Type}, {"Month Name", type text}, {"MMM", type text}, {"M", type text}, {"Day of Week", Int64.Type}, {"Day Name", type text}, {"DDD", type text}, {"D", type text}, {"FYMM", Int64.Type}, {"MMMYY", type text}, {"MonthID", Int64.Type}})
in
#"Changed Type"
Calendar Year Calendar
let
/*
Excelerator BI a division of Agile Insights
** www.xbi.com.au
**This Calendar was created and provided by Jason Cockington
**This can be freely shared as long as this text comment is retained.**
*/
#"Excelerator BI Basic Calendar" = "",
Source = List.Dates(StartDate, Length, #duration(1,0,0,0)),
StartDate = #date(2025, 1, 1),
Length = Duration.Days( EndDate - StartDate ) +1,
Today = Date.From( DateTimeZone.SwitchZone( DateTimeZone.UtcNow(), 10) ),
EndDate = Date.EndOfYear( Date.AddYears( Today, 0) ),
#"Converted to Table" = Table.FromList(Source, Splitter.SplitByNothing(), null, null, ExtraValues.Error),
#"Renamed Columns" = Table.RenameColumns(#"Converted to Table",{{"Column1", "Date"}}),
#"Inserted Year" = Table.AddColumn(#"Renamed Columns", "Year", each Date.Year([Date]), Int64.Type),
#"Inserted Month" = Table.AddColumn(#"Inserted Year", "Month", each Date.Month([Date]), Int64.Type),
#"Inserted Month Name" = Table.AddColumn(#"Inserted Month", "Month Name", each Date.MonthName([Date]), type text),
#"Inserted MMM" = Table.AddColumn(#"Inserted Month Name", "MMM", each Text.Start([Month Name], 3), type text),
#"Inserted M Month" = Table.AddColumn(#"Inserted MMM", "M", each Text.Start([MMM], 1) & Text.Repeat(Character.FromNumber(8203), [Month]), type text),
#"Inserted Day of Week" = Table.AddColumn(#"Inserted M Month", "Day of Week", each Date.DayOfWeek([Date], Day.Monday)+1, Int64.Type),
#"Inserted Day Name" = Table.AddColumn(#"Inserted Day of Week", "Day Name", each Date.DayOfWeekName([Date]), type text),
#"Inserted DDD" = Table.AddColumn(#"Inserted Day Name", "DDD", each Text.Start([Day Name], 3), type text),
#"Inserted D Day" = Table.AddColumn(#"Inserted DDD", "D", each Text.Start([DDD], 1) & Text.Repeat(Character.FromNumber(8203), [Day of Week]), type text),
#"Inserted YYMM" = Table.AddColumn(#"Inserted D Day", "YYMM", each Text.End(Text.From([Date], "en-AU"), 2) & Text.PadStart( Text.BeforeDelimiter(Text.From([Date], "en-AU"), "/") , 2, "0"), Int64.Type),
#"Inserted MMMYY" = Table.AddColumn(#"Inserted YYMM", "MMMYY", each Text.Combine({[MMM], Text.End(Text.From([Date], "en-AU"), 2)}), type text),
#"Added MonthID" = Table.AddColumn(#"Inserted MMMYY", "MonthID", each (Date.Year([Date]) - Date.Year(StartDate))*12 + Date.Month([Date])),
#"Changed Type" = Table.TransformColumnTypes(#"Added MonthID",{{"Date", type date}, {"Year", Int64.Type}, {"Month", Int64.Type}, {"Month Name", type text}, {"MMM", type text}, {"M", type text}, {"Day of Week", Int64.Type}, {"Day Name", type text}, {"DDD", type text}, {"D", type text}, {"YYMM", Int64.Type}, {"MMMYY", type text}, {"MonthID", Int64.Type}})
in
#"Changed Type"
And here is the Power Query Calendar table PBIX workbook.
Learn to be a Power Query Expert
If you want to fast track your learning so you can leverage all the power of Power Query, take a look at our Power Query training course.
Once you know how, you will be able to save time when creating a Power Query calendar table and do fantastic things you never dreamed possible as a Power Query expert.
Very practical and actionable tips. 👉 Watch Live Tv and explore 1200+ channels worldwide — fast, reliable, and always live with oneo tv.
Asking questions are in fact good thing if you are not understanding anything totally, but this article presents good understanding yet.
I have read some just right stuff here. Definitely value bookmarking for revisiting. I wonder how so much attempt you place to create one of these magnificent informative web site.
I have not checked in here for some time as I thought it was getting boring, but the last few posts are great quality so I guess I?¦ll add you back to my everyday bloglist. You deserve it my friend 🙂
An impressive share, I just given this onto a colleague who was doing a little analysis on this. And he in fact bought me breakfast because I found it for him.. smile. So let me reword that: Thnx for the treat! But yeah Thnkx for spending the time to discuss this, I feel strongly about it and love reading more on this topic. If possible, as you become expertise, would you mind updating your blog with more details? It is highly helpful for me. Big thumb up for this blog post!
As soon as I found this web site I went on reddit to share some of the love with them.
hi!,I really like your writing very a lot! percentage we keep up a correspondence extra approximately your article on AOL? I require an expert in this space to solve my problem. Maybe that’s you! Looking ahead to peer you.
Hi there! Do you know if they make any plugins to safeguard against hackers? I’m kinda paranoid about losing everything I’ve worked hard on. Any suggestions?
I dugg some of you post as I cerebrated they were handy invaluable
I haven’t checked in here for some time since I thought it was getting boring, but the last few posts are great quality so I guess I’ll add you back to my daily bloglist. You deserve it my friend 🙂
I haven¦t checked in here for a while as I thought it was getting boring, but the last several posts are good quality so I guess I¦ll add you back to my everyday bloglist. You deserve it my friend 🙂
Hello there, I discovered your website by the use of Google while looking for a related subject, your web site came up, it seems great. I have bookmarked it in my google bookmarks.
This web site is really a walk-through for all of the info you wanted about this and didn’t know who to ask. Glimpse here, and you’ll definitely discover it.
What¦s Happening i am new to this, I stumbled upon this I have found It positively useful and it has helped me out loads. I’m hoping to give a contribution & aid different users like its aided me. Good job.
Thanks for the sensible critique. Me and my neighbor were just preparing to do a little research on this. We got a grab a book from our local library but I think I learned more clear from this post. I am very glad to see such wonderful info being shared freely out there.
amei este site. Para saber mais detalhes acesse nosso site e descubra mais. Todas as informações contidas são conteúdos relevantes e exclusivas. Tudo que você precisa saber está ta lá.
incrível este conteúdo. Gostei muito. Aproveitem e vejam este conteúdo. informações, novidades e muito mais. Não deixem de acessar para aprender mais. Obrigado a todos e até mais. 🙂
Some truly superb information, Gladiolus I observed this. “The Diplomat sits in silence, watching the world with his ears.” by Leon Samson.
It’s the best time to make some plans for the future and it is time to be happy. I’ve read this post and if I could I want to suggest you some interesting things or tips. Perhaps you can write next articles referring to this article. I desire to read more things about it!
Well I definitely enjoyed studying it. This information offered by you is very constructive for correct planning.
Thank you for sharing excellent informations. Your web-site is so cool. I am impressed by the details that you¦ve on this web site. It reveals how nicely you perceive this subject. Bookmarked this web page, will come back for extra articles. You, my pal, ROCK! I found just the information I already searched everywhere and just could not come across. What an ideal web site.
My developer is trying to persuade me to move to .net from PHP. I have always disliked the idea because of the costs. But he’s tryiong none the less. I’ve been using WordPress on numerous websites for about a year and am concerned about switching to another platform. I have heard great things about blogengine.net. Is there a way I can import all my wordpress content into it? Any help would be really appreciated!
What’s Happening i am new to this, I stumbled upon this I have found It absolutely useful and it has helped me out loads. I’m hoping to give a contribution & help different customers like its helped me. Good job.
You are a very intelligent individual!
Thank you for your sharing. I am worried that I lack creative ideas. It is your article that makes me full of hope. Thank you. But, I have a question, can you help me?
On latina kitten pictures, it’s certainly not just about looking good—it’s about having down and dirty. These Latinas are usually deep into their dreams, taking big cocks, playing with toys and games, and getting included in cum together with total enthusiasm. An individual can see how much they love it, making the encounter even better for the viewer.
Hi Matt! Just wanna say BIG THANKS for sharing this to us! You helped us save time updating static date lists and reports with no dynamic date references. Copy-pasting the link to this post in my M code so that future analysts can come back here for more details. Kudos and cheers from Japan!
👍😄
I have created a DatSource/Report that gets the last 12 Months of Data from TODAY, as such I want to create a Calendar Table that also has the last 12 Months of Dates from TODAY and is updated accordingly.
If I create a Table using the following,
tblDates = CALENDAR(NOW()-365, Now())
The table is created as I require and updated on a daily basis , however, it does not appear in the Power Query Editor and cannot be referenced by other queries.
Can I create this table using your code within this article so that the Start Date is Today – 365 days?
How do I update the Table so that it will ALWAYS show the previous 365 days from TODAY?
Correct. If you use DAX to create a calendar table using CALENDAR( ), it is not available in PQ. Yes, my code will work. You should be able to change lines 8, 9, 10 as
StartDate = DateTime.Date(DateTime.LocalNow()),
Today = DateTime.Date(DateTime.LocalNow()),
Length = 365,
I think it should work. It won’t handle leap years.
Hi Paul,
If you need your calendar to adjust for leap years, rather then running the calendar for a length of 365 days, you’d be better off defining your Start Date as:
StartDate = Date.AddYears( Date.From(DateTime.LocalNow()), -1)
This will return Today, Last year, so when there are 29 days to February it will still work.
Just an alternate option for you.
Really an interesting post to create a calendar table using M-query.. My question is what happens in Leap years and in the month of Feburary, as well as months where the number of days are 31 when you are calculating month Number?
For example
FY Start Date : 01.10.2019 FY end date : 30.09.2020
dates MonthName
11/30/2019 February
11/31/2019 March
I’m not sure what you are asking. If you have a fin year that starts on a different date, you need to adapt the query accordingly. I show you how to do this for a 30 Jun fin year, just adapt that for your fin year.
Hi Matt,
Great post. If I have to subtract 365 days from my Enddate (which is today), how to change it?. Basically how to substract # of days?
Hi Vikrant,
To subtract 365 days from your end date (Today), just simply modify your End Date formulawith another #duration modifier:
= DateTime.Date(DateTime.LocalNow()-#duration(365,0,0,0))
This will give you the same date as today, but from the previous year.
Hie,
Our Fiscal year begins on 01/01/2021 and ends on 31/12/2021.
Our Accounting Preiod or Month are as follows
Jan 01/01/2021 to 25/01/2021
Feb 26/01/2021 to 25/02/2021
Mar 26/02/2021 to 25/03/2021
Apr 26/03/2021 to 25/04/2021
May 26/04/2021 to 25/05/2021
Jun 26/05/2021 to 25/06/2021
Jul 26/06/2021 to 25/07/2021
Aug 26/07/2021 to 25/08/2021
Sep 26/08/2021 to 25/09/2021
Oct 26/09/2021 to 25/10/2021
Nov 26/10/2021 to 25/11/2021
Dec 26/11/2021 to 31/12/2021
When i filter by dates i want these months to be applied as they are. How do i go about it? Please assist.
The same must apply on the time intelligent analysis.
Thank you in advance.
Thank you Mr. Allington,
I have used your explanation to built a fast and useful calendar in my query and you made my day.
Awesome, thanks!
One quick Q as a newbie…What part of the code I should change to make the calendar ending by december 2022?
I tried simply to add 1640 days from start date (Duration.Days(1/12/2022 – StartDate)) and gave me this message
Expression.Error: We cannot apply operator – to types Number and Date.
Details:
Operator=-
Left=4,12133E-05
Right=1/1/2019
So lost…
Dear Matt,
Thank you for sharing your valuable insights and clear instructions with our community!
I hope its ok that I had just 2 brief follow-up questions.
1. I was wondering what steps you took to create the “ID Columns” with the syntax: (Date.Year([Date]) – Date.Year(StartDate))*12 + Date.Month(Date).
2. I hope you don’t mind sharing the steps you took to create columns with only the first 3 letters showing of the month and week day showing
I hope this is ok to ask. Apologies if it seems quite obvious as I just started on Power BI. I really found your article so helpful!
Thank you so much in advance for all your time!
-G
1. I used the Add Column, Custom Column and wrote the formula using a little M code and referencing the columns from the list on the right hand side of the dialog. It is very similar to adding a column to an Excel table.
2. Using the menu, Add Column, Extract, First Characters, 3
Good luck with the learning
Hello Sir,
How to actually calculate Fiscal Week in M-Language? Year Starts from 1st of May till 30th April.
Where as Monday is the first Day of the Week and Sunday is the Last Day of the week.
Any help?
Both of the techniques needed to do what you want are covered above. Find where I add 184. Replace 184 with the number of days from the start of your fin year to the end of the calendar year. Also, find the point where I change the order of the days and make a suitable adjustment.
Greetings From California’s Central Valley Matt,
Everything worked as advertised in your excellent post. Did a tiny bit of tweeking to adjust my calendar to an October 1st Fiscal Year start, etc. and I am most pleased with the result. As a relative newcomer to the world of Power Query, Power Pivot, and Data Models, your post highlighted that I have a great deal yet to learn. This was a fantastic start. Have a great day 😉
Matt,
For the Start Date, how about adding a parameter lookup in Excel that updates without having to open the Mcode?
So I added a new table in Excel and created this parameter
let
Source = Excel.CurrentWorkbook(){[Name=”Table2″]}[Content],
#”Changed Type” = Table.TransformColumnTypes(Source,{{“StartDate”, type date}}),
Crit = DateTime.Date(Record.Field(Source{0}, “StartDate”))
in
Crit
Then in the Calendar, replaced the Start Date hard coded date with =Start which is the name of the Query above.
Alan
Alan
Yes, if you are using Excel, that can work. The thing is the start date doesn’t change often, if ever. Personally I reserve those types of Excel parameters for things I need to easily change in the future.
Hi Matt,
Calendar week is Thursday to Wednesday, Calendar year starts from the week that contains the first date of Feb…
How to incorporate this into the YEAR logic?
Thanks a lot for help in advance
Chau
This is not a small topic that I can answer here. There is a week number option under “date” that you can use, or you can use some Index based on first date of your year and go from there.
Very Helpful,
The easiest way to learn,
I believe there’s a slight mistake on the last column for MonthID.
Shouldn’t the last added custom column, instead of:
(Date.Year([Date]) – Date.Year(StartDate))*12 + Date.Month(StartDate)
be:
(Date.Year([Date]) – Date.Year(StartDate))*12 + Date.Month([Date])
? Please clarify.
Sorry, yes. This had been previously corrected in the code but I missed the error in the explanation. It is now fixed. Thanks.
Dear Matt, thanks so much for this easy to follow tutorial on how to set up a calendar. This is amazing. I am going to read many more of your posts. Thanks again!
Matt thanks so much for this awesome post. I knew I needed to do a calendar table but didn’t know where to start and I think I saw this post a long time ago before I was ready for it – you really set out a practical gem of a solution. Now I have to read all the comments which look really interesting.
Hi Matt,
Fin Year of April-March but that has the actual year as beginning in April is: = each Date.Year([Date]+#duration(275,0,0,0))-1, Int64.Type)
eg. April 2014 is April 2014, March 2015 is March 2014
Hey Matt,
This is such a great tutorial to go through and I am nearly finished.
However, I’ve hit a snag.
My FY starts on April 1. So instead of 184, it’s 275 and to get the month it’s >=4 then Date.Month([Date])-3 else Date.Month([Date])+9.
The problem is, I want that FY to be the year before.
Example:
If it’s 1 March 2020, I want the FY to be Mar19
If it’s 1 April 2020, I want the FY to be Apr20
Your code gives me:
Mar20 as FY20
and Apr20 as FY21
I need:
Mar20 as FY19
Apr20 as FY20
Mar21 would be FY20
Apr21 would be FY21
Dear Sir,
I want to create a Calender table which starts with Year as 1st of May and ends on 30th April and weeks starts from monday to sunday, I need Days, weeks, Months, then seasons (Winter and Summer), The year is divided into two halves of 27 weeks and then seasonal month and their weeks.
Kindly help
I have explained the process in this article. If you need someone to do it for you, you could try asking at community.powerbi.com
Thank you so much…. you saved my day. I will write a longer comment of how I used your method to solve the “Data Model”.;. show items with no data… disabled.
Thank you Matt
Most useful
Hi!
How to use min date of your data in StartDate (not hard coded value)?
create a new query by referencing your fact table. click on the date column and then remove other columns. filter on the earliest date. Right click on the cell and drill down. This will give you the date. Name the query “FirstDate”. Then change the step in my query “start date” to =FirstDate. I will probably update this post some time to cover this.
Hi Matt,
Thanks for the wonderful web site you have, very helpful to newbies. By the way I have worked on the Calendar and have integrated to it two different fiscal years as follow:
For July fiscal year one would use your query, for those who would have a fiscal year April 1 then they would have to change the following statement:
From:
#”Inserted Month” = Table.AddColumn(#”Inserted Day Name”, “Fin Month”, each if Date.Month([Date]) >=7 then Date.Month([Date])-6 else Date.Month([Date])+6 , Int64.Type)
To:
#”Inserted Month” = Table.AddColumn(#”Inserted Day Name”, “Fin Month”, each if Date.Month([Date]) >=4 then Date.Month([Date])-3 else Date.Month([Date])+9 , Int64.Type)
This would adjust accordingly.
For those who would be interested in having the solution to the fiscal year.
Cheers!
Chuck
Hi Matt,
RE: your fiscal year trick: “…add 184 days to the date before extracting the year…” This may work for calculating fiscal year but when it comes to smaller units of time this method comes undone. I created an additional column to derive all my fiscal columns from:
#”Fiscal Source” = Table.AddColumn(#”Changed Type”, “Fiscal Source”, each Date.AddMonths([Date], 6))
This way, the 29th, 30th, and 31st of August 2015, for example, all map to the 29th of February 2016, keeping the fiscal month correct (i.e. August is the 8th calendar month and all days in August should be in the 2nd fiscal month).
I created columns for fiscal year, quarter, month, etc. so I assume calculating this once, as above, is more efficient than doing the calculation for every fiscal column. (I may be wrong – Microsoft could be optimising the additional recalculations away).
I take offence at the great lengths you go to to remove the century from the year in your section on “YYMM Column”. To paraphrase Scott Morrison: Why the bloody hell would you? Keep it simple and stick to the ISO 8601 standard:
#”Added Custom” = Table.AddColumn(#”Fiscal Source”, “Date ISO8601”, each Date.ToText([Date], “YYYY-MM-DD”))
Adjust the format as necessary for the desired units of time. Speaking of which: the Microsoft documentation for Date.ToText says “For a complete list of supported formats, please refer to the Library specification document.” The library specification document is not publicly available – I don’t suppose you’d have access to this? I did leave feedback for Microsoft to include the list of formats in the documentation.
Thanks,
Michael
Hi Matt,
I have one minor correction. I believe that the code for adding the MonthID column in the body of the article is wrong:
([Fin Year] – Date.Year(StartDate))*12 + Date.Month(StartDate)
The code in the complete listing works well:
(Date.Year([Date]) – Date.Year(StartDate))*12 + Date.Month([Date])
(Most people probably just copy the complete code but I was following the article step by step…)
Thank you very much for this code!
Hi Raf,
Thanks for pointing that out. You are quite correct.
At least we know now that everyone has just been copying the final code 😉
This is the best page out of many on creating a calendar table, thanks Matt.
Hi Matt and thanks for your excellent book – Supercharge Power BI. I downloaded the calendar above and notice it doesn’t have the ID column. I just added an index column to the table – will that work okay for the purposes of creating a unique daily ID?
Also, I’m working on weekly reports. Is there much benefit creating a weekly ID column as well for each of our week endings or just use the daily ID column knowing we have 7 days per week ?
You can add an index column, but technically you don’t need it as a date column can be used as the unique ID anyway. If you are doing weekly reports and you want to compare TY vs LY (eg week 10 this year vs week 10 last year), you can definitely benefit by a week ID column. If you just want to compare any given 7 days with the prior 7 days, or with the same set of dates from prior year, then you can just use the date column/date ID.
Hi Matt,
Just looking at your calculation for the “Fin Year”
= Table.AddColumn(Custom1, “Fin Year”, each Date.Year([Date]+#duration(184,0,0,0)),Int64.Type)
does this calculation account leap years?
Thanks
Andy
The first time I saw this +184 formula I had my doubts too. But it does work. The reason it works for leap years is because the +184 gets added to the second half of the calendar year which doesn’t include any leap year differences
Thank you. Great tip and saves time.
Hi Matt, This has been great as I also require the Aust Financial year calendar. I have been looking at the calendar though and given that it is based off the Datetime.localnow() It only seems to go up to the current date. Is there any way to have the end date of the calendar be in a year from today? Thanks for your help.
Hi Matt,
This was excellent and really simple to follow, thanks. I am a beginner and this made a lot of sense
I created the YYMM column as explained. you mentioned that this will allow sorting chronologically but when I am in report view and want to sort MMM column by YYMM I get an error message:
‘We can’t sort the ‘MMM’ by ‘YYMM’ There can’t be more than one value in ‘YYMM’ for the same value in ‘MMM’. I fixed the issue by sorting by Fin Month but I’d like to understand how to use YYMM. can you please let me know?
Thanks a lot!
The column YYMM will sort correctly without using a sort over-ride. a column MMYY will not sort correctly unless you have a sort over-ride column. You can only use a sort over-ride column if it is at the same level of carnality as the destination column you are overriding . eg, if you are sorting a MMM column, you will need a sort over-ride column with 12 unique values that match to each value in the MMM column
Nice post, but I’m wondering what’s the performance of generating a table in PowerQuery versus having a(n excessively) large static date table (filtered with Now()) as a query. Basically I’m wondering if PowerQuery would generate the data faster or read from disk faster (let’s assume an SSD).
Any inkling of what the performance differences might be?
Sorry, I don’t know. I assume loading from SSD would be faster than using PQ to generate the table.If you have the calendar table already, then I would never use PQ. If you don’t have the calendar table, I think PQ is fast enough to do the job – it is unlikely that your fact table will be finished first, so the PQ calendar table will be waiting for the fact table anyway.
You should be able to do it in power query. Add column, merge columns, and use a dash as the separator.
Ive tried to create new column .Butstill I am getting this error saying ;
Expression.Error: The column ‘YYYYMM’ of the table wasn’t found. Details: YYYYMM
“Inserted MonthYearLong” = Table.AddColumn(#”Inserted First Characters1″, “Year Month”, each [Month] & “-” & Text.From([Year])), But I am getting error while I am trying to record the column details;
#”Reordered Columns” = Table.ReorderColumns(#”Inserted First Characters1″,{“Date”, “Fin Year”, “Month Name”, “MMM”, “YYYYMM”, “Fin Month”, “Day Name”, “DDD”, “Day of Week”}),
If you post all the advanced code with the error in place, I will take a look.
Hi Matt, How can i get the column value like dis ; 2019-Jan
Hi Matt, I was following the steps you described very closely, but somehow, the “Day of Week” I generated is as followed Mon = 1, Tues = 2, Wed = 3, Thu = 4, Fri = 5, Sat = 6 and Sun = 0. So by adding 1 to the formulae will not work. How can I change Sun =7??
My guess is you have added the 1 inside the brackets with [Date] instead of outside the bracket.
I have not edited to the formula yet, and the result column is as I described above. The unedited formula is as follows: = Table.AddColumn(#”Renamed Columns2″, “Day of Week”, each Date.DayOfWeek([Date]), Int64.Type).
The default is Sunday being the first day of the week. Hence Sunday is 0, Monday is 1, etc. There is an optional parameter where you can specify an alternate first day of week Date.DayOfWeek([Date],Date.Monday)
hi there,
i have created the calendar from my table date filed, please help me to select the date range as financial year wise because with this it provide result as calendar year wise.
I cover this in the blog article already.
The fiscal year formula didn’t work for me. I started with the date 01/04/2017 and wanted this to show 2018 as the fiscal year (i.e. 2017/18) so the only i could get that to work was to add 365. It seemed to work until I got to 01/01/2018 and then made this 2019 (but it should really be 2018 as its part of fiscal year 2017/18. I’m probably doing something wrong but I copied your steps to the letter (great tips though btw, I learned a lot in just one small tutorial)
My fiscal year formula works for a 30 june year end. If that is not your year end, then of course it won’t work. I add 184 days because there are 184 days from July to Dec. if your FY starts on 1st april, I guess you should add 275 instead
Yes you are right. I put 91 days as being from the start of the calendar year and should have taken that from 365 instead! D’oh
Hi Matt
I have tried to use this same logic to create a calendar that grows by weeks; i.e. 26/11/18 to 03/12/18. But the calendar has grown by 102 weeks due to the Duration.Days(DateTime.Date(DateTime.FixedLocalNow())-#date(2018,7,1)) portion of the formula. Is there a way to change this so that my calendar will only show the number of weeks that have occurred since the 26th of Nov 2018?
Thanks
Cara
If I were creating a week calendar, I would first take my day calendar above, then filter on the last day of your week (eg if Sunday is the last day of each week, then filter on Sunday). Then remove all day related columns (such as day name) and then remove duplicate rows
Copy. Paste. Done.
It’s extremely easy. Thanks for sharing.
Regards.
Armando.
Hi,
thanks for your post, I found it quite useful and interesting. I’ve used DAX calendars before, and I can see the benefits of a Query M Calendar table.
As our firm has a different Financial Year from the one mentioned in the post (the new year starts on 1 April), you have to subtract days from the date to get the FY, and in this scenario you have to calculate with the leap years (29 February). So I made a solution for it, I hope somebody will find it useful.
#”Added Custom” = Table.AddColumn(#”Inserted Day of Year”, “Custom”, each if Date.IsLeapYear([Date]) = true then Date.Year([Date]-#duration(91, 0, 0, 0)) else Date.Year([Date]-#duration(90, 0, 0, 0)))
Regards,
Andris
You will need to write a new query that first extracts the public holidays. I guess that would be a table with the date in 1 column and the name of the holiday in the second column. Set this table so it doesn’t load. Then from the calendar table, merge the calendar table with the holiday table using the date as the common column. Set it to left outer join and then extract the columns from the holiday table.
Hi, thanks for the post. How should I adjust the code if I wan to add to calendar also information about public holidays as separate column. Information about public holidays is in separate table. I want to do it in Query not DAX.
I haven’t really started to read the book yet – I have just read the intros.
I don’t know what I liked the most about the article:
:: – Calendar tips
:: – Power Query M hacks and tips
Now you made me curious of what else can we leverage from M. Please give me your impressions on “Collect, Combine, and Transform Data Using Power Query in Excel and Power BI” By Gil Raviv, because I’m buying another book and this can be the one.
Thanks for the article.
There are various ways to do this. One easy way to get a month calendar is to create a day calendar, add a “Day number of month” column, then filter to keep the first day of each month only.
Hi, my dates are showing up as days whereas yours are 1 record per month (1/1/2016, 2/1/2016 etc). How did you achieve this?
Thanks
I’m pretty confident it hasn’t been removed. Did you type =List.Dates or List.Dates?
I am using the september 2018 version of PBID and I did not get the parameter prompt after entering List.Dates any idea why this feature would have been removed?
Howdy Matt – there is a line break in your code sample above which causes errors on “MMM” – you can see it on the left “, each Text.St….
if I remove the line break it works perfectly.
Thank you,
Hello Matt,
Thanks for the example.
My company uses a custom fiscal calendar consisting of 13 periods per year. Each period contains 4 weeks, except for “leap years” when period 13 contains 5 weeks.
We already have a date table that contains all this info. I’ve been struggling with getting time intelligence in PowerBI to play nice with our calendar. Do you think your approach would help?
Thanks,
Mark
No, this calendar table wont help you given you say you already have an accurate calendar. You need to use custom time intelligence instead of the inbuilt functions. I cover that here https://exceleratorbi.com.au/dax-time-intelligence-beginners/
I was still using the code from your previous article on powerpivotpro.com!
Thanks for this – it looks awesome.
is it correct to assume that if you were working in PowerBI and wanted a calendar table you should use the appropriate DAX function? If however you need to create a calendar table and you don’t have DAX then this is a good solution? I.e. is there a reason you might use this method, even if you did have access to the DAX formulas?
Whether to use DAX or Power Query is a personal choice. Marco Russo has produced a very comprehensive dax calendar table. Personally I prefer Power Query. I prefer to leave dax to Data modelling and power Query/ M for Data loading and transformation, but it is not clear cut. However a valid use case may be to load public holidays into your calendar in the form of a working day flag. This would be a lot easier and neater in Power Query in my view.
Hi Matt,
Thanks for sharing this knowledge. I am a frequent visitor to yours and other blogs.
I have tweaked this a little so my end date will be the EoM of previous month.
With regard to workdays I currently just maintain an excel sheet a table with dates and one with holidays and use NETWORKDAYS. I then merge in PQ with the calendar table on the first of the month. I would love PQ to have this function. Soon I expect to have to maintain calendar with workdays across Asian countries.
You should see if someone has already proposed this at ideas.powerbi.com. If not, then create a new idea
There’s a typo “MMM#(lf)” in the step #”Reordered Columns”.
Furthermore, your MonthID column does not return the right sequence. I replaced it by:
#”Added Custom1″ = Table.AddColumn(#”Changed Type1″, “MonthID”, each (Date.Year([Date]) – Date.Year(StartDate))*12 + Date.Month([Date]))
Nice to know the +#duration(184,0,0,0) trick!
Thanks for catching these things.
Hi Matt, adding 184 days to a date delivers the wrong result in some cases, e.g. when the date is 29 to 30-Dec, so the financial month will be wrong. I find that looking at the current month number and deriving the financial month from that works a lot better: = Table.AddColumn(#”Inserted Month Name”, “Fin Month”, each if Date.Month([Date])> 6 then Date.Month([Date]) – 6 else Date.Month([Date]) + 6)
It works for financial year. If I used it for financial month (which I see I did), then that was definitely a (lazy) mistake on my behalf – I didn’t think it through. Thanks for letting me know. I have modified the code
Hi Matt:
TX for the tutorial. A very interesting point you raised is that the steps do not need to follow in any order.
Your quote above reads:
“The query still works of course. Note that the Source step is now referring to the StartDate step, yet the StartDate step doesn’t appear until way down the list of steps. This is perfectly legal in the M language – the steps do not have to be executed in any logical order.”
Does this apply to scalar values only? In other words, PQ can pick up on a scalar value anywhere in the Applied Steps? As I understand it, the function steps need to be in a specific order as the query transforms the data from top to bottom, not so?
please confirm this point.
Cheers
There is no requirement for the steps to be in any order regardless if they are scalar values or tables. By default the UI will create the steps in order because that is the logical way people will want to work through a task, but this is not a requirement for it to work. You can put any line of code in any order you like and it will still work.
I do similar, but more often than not, I make the calendar fully dynamic based on the data being pulled. First I create to variables. ONe is the StartDate, and the other is the EndDate.
Start Date might be: #date(Date.Year(List.Min(#”Removed Other Columns”[Due Date])),1,1)
So it pulls Jan 1 from the earliest year in the data set. Could be invoice records, Ledger data, whatever. I am programmed to always do full years when I build tables. Not sure if it was your book that discussed that or not to make the DAX functions that depended on dates work best in financial models.
End Date would be: #date(Date.Year(List.Max(#”Removed Other Columns”[Due Date])),12,31)
So Dec 31 from the latest year in the data set.
Then my calendar starts with the source as =StartDate and my DatesAsList looks like this:
= List.Dates(Source,Number.From(EndDate)-Number.From(Source)+1,#duration(1,0,0,0))
Next step is convert to a table, and add all the relevant columns.
Awesome, that is exactly what I am thinking to do, but I do not understand pretty well what you did it, could you give more details, please
Great post Matt, your method is so easy and the financial year DAX formula is a great way to achieve that column as opposed to other methods I have seen…Say thanks to Dave for us! and keep up the great blog posts!