One of the features of Power BI (and Power Pivot) is that data cannot be changed once it is loaded into the database – this is by design. Power BI is a reporting database, it is not a spreadsheet. Power Pivot and Power BI are built to faithfully report on the data that is loaded and do not allow a user to “change” the data after load. This paradigm is very different for those that live in an Excel world. When you use Excel, you can override any single number (or numbers) you want to, in case you need to make such a change.
The Best Solution – Fix the Source!
Let me make this statement upfront and be clear. The best way to solve problems with source data are to go back to the source and correct the problems there. This is my recommendation on how you should solve such issues. However, sometimes that is not possible for whatever reason. This article will explain how you can use Power Query to override incorrect data during load when you can’t change it at the source, for whatever reason.
Self Referencing Tables
One option you could use to change data is to use the self referencing tables concept I blogged about in this article. This approach can work but it has one downside. You must load all of the data from the source into Excel, and only change the individual data that are wrong. While this can work for small data sets it is not practical for larger data sets.
Using Override Tables
One better way to solve this problem using Power Query is to create an Excel table that contains the exceptions that need to be corrected. You then load that Excel table into Power Query along with the source and substitute the incorrect data with the corrected data. I wrote an article on how to substitute individual data points back in 2017. In the article today I will show you how to use substitute tables to replace entire records in your source data.
I am using the Adventure Works database to demonstrate.
Replacing Incorrect Records With An Override Table
Here are the steps to replace incorrect records with correct records using an override table.
- Identify the incorrect record(s) in the source table.
- Take a copy of the entire record(s) and add it to an override (exception) table in Excel.
- Make changes to the record(s) as needed.
- Use Power Query to remove the original record(s) from the source and replace it with the modified version.
Here is a step by step demo
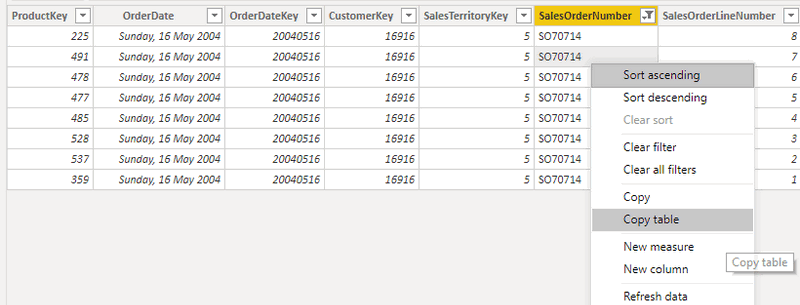
The following entries are for an invoice (#1) in the Sales table. Let’s say that the cost (#2) of one line item is incorrect.


- You can then paste the records into an Excel worksheet.
- Turn the records into a table (or append to an existing table if you have one already). Give the table a good name, say InvOverrides.
- See a sample below.

- Keep only the rows you want to modify, and delete the rest. You could do this in Power BI when you first extract the records, or simply do it in Excel once you have a copy loaded there.
- Make the necessary corrections to each row (see below in green).

- In Power Query inside Power BI, create a new query and load the InvOverRides table from the Excel file.

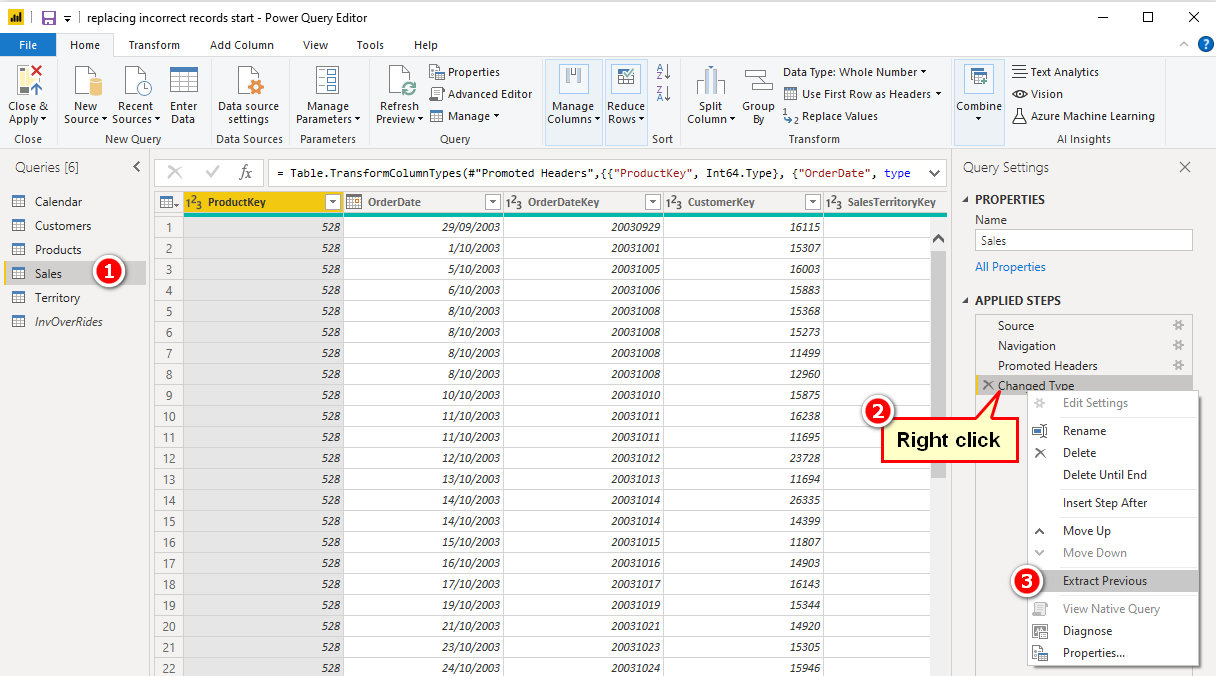
- Create a staging query for the Sales table and name it SalesStaging. You can do this by right clicking on the current sales table final step, and select “Extract Previous”.

- Now you have the SalesStaging query with the original rows of data.

-
To remove the rows that need to be corrected from the original table, you simply merge the SalesStaging query with the InvOverRides using a left anti join. This will keep the records that only exist in the source table while removing those that also exist in the InvOverRides table – exactly what you need. Note well: I have joined the 2 tables as shown below using 2 columns for the join. This is necessary to correctly identify the unique rows (the concatenation of 2 columns make each row unique). This may be different with your data.

- These changes of course flow through to the Sales table.
-
Finally, you need to append the corrected rows from the InvOverrides tables to the bottom of the SalesStaging table.
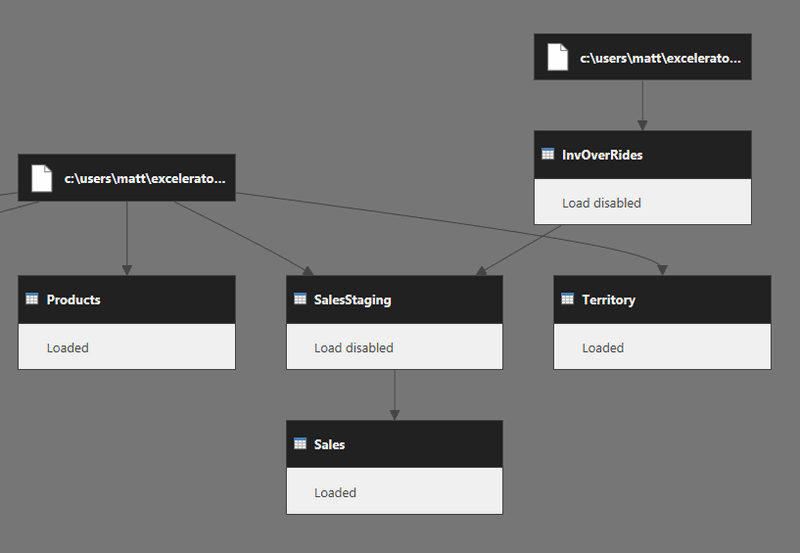
The final query dependency view will look something like this.

Wrap Up
There are variations to how you can complete this exercise. Technically you don’t need the staging table, but I like to create one to keep the manipulation of the changes in one place away from the final table to be loaded.

Thanks for this, very useful.
One comment though, this essentially doubles the amount of time that it takes to refresh my data, because both my original and my staging table have to be refreshed. I am dealing with millions of rows of data, so this may become an issue. Have you run into that?
I’m not sure about doubling, but yes, it will increase the refresh time. How much longer depends on the method. If the data is wrong, it needs to be fixed. The best option is to fix the source
Awesome article on Fixing Incorrect Data in Power BI. It will be really informative and useful for the young data enthusiasts. Thanks for sharing such informative content.
Yet another super practical article from Matt that addresses “real world problems”.
Coming from a database background myself, I make heavy use of the different relationship join types to achieve different query outputs, in much the same way I would create different views in a SQL database.
This is especially useful when using Power BI as a pure ETL system.
Power BI is a super powerful analysis system, but it also has awesome capability as as an ETL tool, or a data QA tool in it own right.
Thanks again Matt.
Ian (from Perth)
Thanks Ian ?
Thanks for that neat solution Matt.
I believe it’s always best to be upfront with modifications to source data and document changes in a related separate table, then process in the corrections. Later classify the nature of the corrections in the corrections table as operator error, authorized correction, or whatever the nature of the corrections are. I guess until the originator of the source table re-issues the table with the correction ‘baked’ in.
If I have simply re-stated your thoughts on this though, my apologies Matt.
(I am already on your newsletter list for new articles Matt – so thank you – Fran)