This is an update to an article that I wrote back in 2019. This time around I created a video to go along with the written explanation and documentation below. You can jump straight to the video below if you prefer that medium.
What is Calendar Over Run?
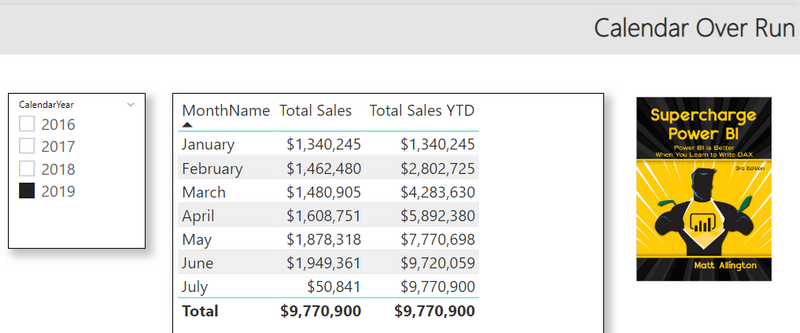
Consider the example below where the CalendarYear is filtered for 2019 and the values of the measures Total Sales and Total Sales YTD are displayed by month. As you can see, the total sales are shown up to July 2019. This is because with the sample data, the last sales date is somewhere in July 2019. However, the values of Total Sales YTD are repeated all the way until the end of year (July 2019 to December 2019). This is what I call Calendar Over Run. It is common to want to prevent this overrun.

Solution Overview
There are at least 2 ways of solving this problem that I am going to show you. Firstly, let’s look at the 2 measures –
Total Sales = SUM(Sales[ExtendedAmount])
Total Sales YTD = TOTALYTD([Total Sales],Calendar[Date])
Solution 1
You can write an if statement and filter out the blank values so that they are not displayed.
Total Sales YTD = IF ([Total Sales] = 0, BLANK(), TOTALYTD([Total Sales],Calendar[Date]))
Then, the visual displays values only up to July as shown below.
Solution 2
There is another way to solve this problem that is my preferred solution – by using a calculated column. This is one of those exceptions where a calculated column is a better approach to a measure; the new column only has 2 unique values and is in a dimension table – it does not take up much disk/memory space.
To start with I have changed the Total Sales YTD formula back to the way it was.
Total Sales YTD = TOTALYTD([Total Sales],Calendar[Date])
Then I wrote a calculated column in the Calendar table as follows:
Past Date = IF (‘Calendar'[Date] >= Date(2019,8,1), “Future Date”, “Past Date”)
Note that in the formula above, I hard coded the date to be 1st August 2019. I did this for illustrative purposes. You would normally use the TODAY() function to get the current date and use that instead, that way the calculated column is updated on each refresh to reflect the current date.
Next, I placed Past Date on in the filters pane, Page Filters and filtered out Future Date as shown below.

Once deployed, this returns the same result as before.
Watch the Solution on Video
I recorded this short video stepping through the entire process.
You are my inspiration , I have few blogs and rarely run out from to post .
Great write-up, I am regular visitor of one’s blog, maintain up the excellent operate, and It’s going to be a regular visitor for a lengthy time.
I¦ll immediately snatch your rss as I can’t to find your email subscription hyperlink or e-newsletter service. Do you’ve any? Kindly allow me understand so that I could subscribe. Thanks.
Thank you for helping out, excellent info. “If you would convince a man that he does wrong, do right. Men will believe what they see.” by Henry David Thoreau.
I’ll immediately grab your rss as I can not to find your email subscription link or e-newsletter service. Do you have any? Kindly let me realize so that I may subscribe. Thanks.
Lovely just what I was searching for.Thanks to the author for taking his time on this one.
Yesterday, while I was at work, my sister stole my iphone and tested to see if it can survive a twenty five foot drop, just so she can be a youtube sensation. My apple ipad is now broken and she has 83 views. I know this is totally off topic but I had to share it with someone!
Pretty nice post. I just stumbled upon your weblog and wished to mention that I’ve truly loved browsing your blog posts. In any case I will be subscribing in your feed and I’m hoping you write once more very soon!
Very interesting info!Perfect just what I was searching for!
amei este site. Para saber mais detalhes acesse nosso site e descubra mais. Todas as informações contidas são conteúdos relevantes e diferentes. Tudo que você precisa saber está está lá.
You are a very intelligent individual!
Woah! I’m really digging the template/theme of this blog. It’s simple, yet effective. A lot of times it’s difficult to get that “perfect balance” between user friendliness and visual appeal. I must say that you’ve done a very good job with this. In addition, the blog loads very quick for me on Internet explorer. Superb Blog!
Hello my friend! I wish to say that this article is awesome, great written and include almost all vital infos. I¦d like to see extra posts like this .
F*ckin’ tremendous issues here. I’m very glad to see your article. Thanks a lot and i’m looking ahead to touch you. Will you kindly drop me a mail?
I have been absent for a while, but now I remember why I used to love this web site. Thank you, I’ll try and check back more often. How frequently you update your web site?
Some truly interesting information, well written and broadly speaking user genial.
Nice and simple yet useful technique.
Hello Matt, having Today() is somewhat dangerous I prefer to use Max Date from transaction table or refresh date.
It depends on your data. Extracting MAX from your transaction table is a good option.
You can also add a filter to your formula:
CALCULATE(TOTALYTD([Total Sales],Calendar[Date]),filter(Calendar,Calendar[Date]]<=Today()))
Thank you for sharing
Super clear
EndofYear = DATE(Calendar_Current[Year],12,31)
//do not use ENDOFYEAR in case your dates do not go to the year end as it returns the last date in your calendar!!!
Hi Matt, I just realized that the new column on the Calendar table as you wrote in your post should better be a True – False column.
So the last step should be:
#”Added Custom” = Table.AddColumn(#”Inserted Month”, “Date2”, each if [Date] <= Date.From(EndDate([Date])) then true else false)
Matt, my previous comment was not posted, I don’t know why.
Matt, the way I tried to solve this issue was to follow your approach of adding a new Date2 column to my Calendar table and the approach that ‘delswingle’ suggested on the following link,
https://community.powerbi.com/t5/Desktop/Power-Query-M-version-of-CALENDARAUTO-DAX-function/td-p/53747
but to get the End Date (by creating a Power Query function) from the column ‘OrderDate’ from the table ‘FactInternetSales’ that is in the AdventureWorksDW2014 database.
//***Function End Date***
(EndtDate) =>
let
Source = FactInternetSales,
EndtDate = Table.Group(Source, {}, {{“MaxDate”, each List.Max([OrderDate]), type datetime}})[MaxDate]{0}
in
EndtDate
//Calendar Power Query query to create the Calendar table and the Date2 column (the last step in the following query) to later
//filter my Power Pivot Table up to the last date from the FactInternetSales table.
let
Source = List.Dates(StartDate, Length, #duration(1, 0, 0, 0)),
#”Converted to Table” = Table.FromList(Source, Splitter.SplitByNothing(), null, null, ExtraValues.Error),
#”Renamed Columns” = Table.RenameColumns(#”Converted to Table”,{{“Column1”, “Date”}}),
#”Changed Type” = Table.TransformColumnTypes(#”Renamed Columns”,{{“Date”, type date}}),
StartDate = #date(2013, 1, 1),
Today = DateTime.Date(DateTime.LocalNow()),
Length = Duration.Days(Today – StartDate),
Custom1 = #”Changed Type”,
#”Added Custom Column” = Table.AddColumn(Custom1, “Año-Mes”, each Text.Combine({Date.ToText([Date], “yyyy”), “-“, Date.ToText([Date], “MM”)}), type text),
#”Added Custom Column1″ = Table.AddColumn(#”Added Custom Column”, “Mes”, each Date.ToText([Date], “MMM”), type text),
#”Inserted Year” = Table.AddColumn(#”Added Custom Column1″, “Año”, each Date.Year([Date]), Int64.Type),
#”Inserted Month” = Table.AddColumn(#”Inserted Year”, “MesNo”, each Date.Month([Date]), Int64.Type),
//The following Step adds a new column with Dates up to the last date that is on the FactInternetSales table.
//I drag this column to the Filters area in Power Pivot in Excel and deselect Blank to filter up to the last date
// from FactInternetSales.
#”Added Custom” = Table.AddColumn(#”Inserted Month”, “Date2”, each if [Date] < = Date.From(EndDate([Date])) then [Date] else null) in #"Added Custom" If you want your Calendar table to start from the first date from the FactInternetSales and to end up to the last date from your fact table, you need the StartDate function and the following PQ query: //***Function Start Date*** (StartDate) =>
let
Source = FactInternetSales,
StartDate = Table.Group(Source, {}, {{“MinDate”, each List.Min([OrderDate]), type datetime}})[MinDate]{0}
in
StartDate
//***Calendar Table***
let
Start = Number.From(StartDate(null)),
End = Number.From(EndDate(null)),
Source = List.DateTimes(StartDate(null), End – Start + 1, #duration(1, 0, 0, 0)),
#”Converted to Table” = Table.FromList(Source, Splitter.SplitByNothing(), null, null, ExtraValues.Error),
#”Renamed Columns” = Table.RenameColumns(#”Converted to Table”,{{“Column1”, “Date”}})
in
#”Renamed Columns”
I always trim mine too. But if you do, you risk unexpected behaviour. I have never seen such behaviour but I am told it can happen.
I always trim my calendar. I’m with Rob Collie on this one, I don’t understand why you would want the calendar table to go beyond the date you have data. So usually, in Power Query I will usually trim the calendar table using dynamic calcs such as [date]<=Date.EndOfMonth(Date.AddMonths(DateTime.LocalNow(),-1))) if my reporting is always one month behind. You get the idea. This has the added benefit that you could write "current period" measures, such as Sales = TotalMTD('Sales'[Sales],'calendar'[date]) and it will default to the max month in the calendar table without the end user selecting a month (either in a Tabular cube or PBI report). This is especially useful for "snapshot" type data such as AR or Inventory balances.