A client recently asked me if it was possible to build a Power BI report using data from a Microsoft Form. I have come across this question a few times now, and you could be excused for thinking this would be a straightforward task. Despite the fact that Microsoft has developed both Power BI and Microsoft Forms, the process of using the data in a Form with Power BI is not super easy; certainly not as easy as you may expect.
Microsoft Forms
Microsoft Forms (or Forms for short) is an online survey tool that comes bundled with a Microsoft 365 subscription. Forms provide a friendly, simple user interface to create and share surveys. The data is collected online through a browser, and the responses are stored in an Excel file. The solution I present below will show you the best way to configure a Form so that you can report on the responses using Power BI.
Why can’t we use a standard MS Form?
In the example below, I created a new form directly in Microsoft Forms. Easy, right?
- Navigate to forms.office.com
- Click the New Form button

Create the survey, share the form, and gather the responses. Once you have collected responses you will notice that it is possible to export the results to Excel as shown below.

But here’s the issue; this export must be done manually and hence this introduces a manual process that makes the whole process harder than it needs to be. If you take this approach, you will need to rely on manual intervention to download the latest response data every time you want to update your report in Power BI. If you use the above approach, you cannot connect directly to the Excel file without manual intervention.
Microsoft Forms with OneDrive
The best way to remove the need for manual intervention is to trigger the creation of the form from OneDrive, rather than from the Forms home page.
Note 1: For this solution we will use OneDrive, but these same steps can also be applied inside a SharePoint Group. In this example, I will build the form initially in a folder within My Files in my Personal OneDrive for Business account from a browser. The easiest way to find the online version of my OneDrive folder is to navigate to my OneDrive folder in Explorer, right click on the OneDrive folder (#1 below) and select View Online (#2 below).
Note 2: This process works as long as you do not manually edit the table of data stored in Excel. You should not try to manually manipulate the Excel table yourself – if you do, you should expect things to stop workings (you have been warned).

Once you have the browser open, navigate to the location where you would like the survey results to be stored, then click New\Forms for Excel as shown below.

OneDrive will then ask you to give the new Excel file a name and will save it to the folder when you click Create.

You will then be taken to MS Forms, where you create the form as normal. However, because this form was initiated in OneDrive and not directly in MS Forms, when you receive responses in the form, all new responses will be added to the Excel file you just created AND you can directly connect to that file without manual intervention.
To check if you have successfully created the form correctly, you will need to find the Open in Excel button. To find the Open in Excel button, you will need to be in the Responses view of your form. Simply click the Responses tab (#1 below) to switch from the Questions (form creation view) to the Responses (view results) view.

You will know the form has been built correctly if you see a cloud on the bottom of the Open in Excel icon from within MS Forms.

Caution when using a Shared Library as the Home folder
These same steps can also be followed using a Shared Library, however there are potentially two different scenarios you will be presented with when choosing a Shared Library to host your Excel workbook.
1. If your Shared Library is your main SharePoint site, you will be presented with the option to create an Excel Survey. This is not the same as an MS Form, and I recommend you don’t use this approach.
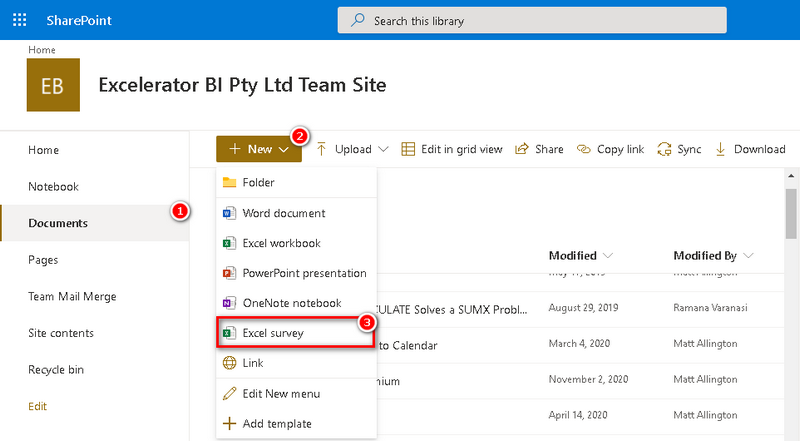
2. If your Shared Library is part of a Microsoft Group, then you will see the Forms for Excel option shown earlier. You should avoid using the “Excel Survey” approach and instead use “Forms for Excel”.
Giving others access to the responses.
The solution I have demonstrated here works, however be aware that the Excel file will be stored in your Personal OneDrive folder. No one else will be able to access the responses (or refresh the Power BI report) unless you instead place the Excel file in a Shared Library Office Group. But all is not lost. There is an additional step that we can apply to our newly created form to change the home folder from your Personal OneDrive to a centralised Shared Library location. Of course you could have created it in the Share Library from the start.

In the image above, you will notice that I have access to two Shared Libraries, the Excelerator BI Pty Ltd Team Site and the Excelerator BI Team. The Excelerator BI Team is an Office Group within Excelerator BI Pty Ltd Team Site and is a perfect location to store my newly created form.
To move the form into this folder, return to MS Forms home page, locate your form, and click on the ellipsis on the right-hand corner of your form (1). Then, simply select the move option from the pop-up menu (2).

When the popup menu appears, select the group you wish to move the form into, and click Move.

To confirm the form moved correctly, check the name assigned to the form. If you succeeded in moving the form to your Shared Library, instead of showing your name as the form owner, it will now display the group.

After the move, you will see the Excel file in the shared folder.

Building the Power BI Report
With our form now in production, we are ready to add it as a data source to Power BI. If you have your Shared Library synchronised to your PC, then you simply need to use the Excel connector (1) and load the data as you normally would from an Excel source. If, however, your Shared Library isn’t sync’d to your PC or you prefer to access it via the cloud to alleviate the need for a gateway, we then have the option to use either the Web or SharePoint Folder connector (2).

Connecting via SharePoint
If you are choosing to connect via the SharePoint Folder connector, you may already be aware that Power BI and SharePoint do not play together particularly well. For more information in this regard, Matt has previously posted an article.
As an aside to the main story of this article, if your SharePoint site has many files stored on it, the standard SharePoint Folder connector will be slow and painful. This is because it is connecting to the site using the SharePoint.Files M function, and thus checking for each and every file present on the site (read “slow and tedious”).

A simple trick to help improve the performance in this regard is to switch the connection to SharePoint.Contents.

With the SharePoint.Contents connector, you will be able to navigate the folder structure of the SharePoint site rather than the individual files, so this is a good solution if all the files you want to load are located within a single folder path. It is less helpful if you want to combine multiple files that are in multiple locations within your site.
Connecting via Web Connector
If you want to connect to the Excel file using the Web.BrowserContents connector you must do it a particular way. You cannot simply copy the URL you see when you navigate to the file in SharePoint.

If you try to connect with this URL, you will see an error.

The correct way to connect to the file is to first connect to SharePoint and then navigate to the path of the file.
To find the path, first open Excel on your computer.
- Go to the browser, click on the ellipsis next to the Excel file (1),
- select Open (2),
- and then select Open in app (3).

Once the file is open in Excel on your PC, go to File, Info (1) and click on Copy Path (2).

Paste the path into the Web connector URL bucket in Power BI Desktop. Remove everything after the .xlsx as shown below

Once authenticated into the SharePoint site, follow the data loading navigator prompts as you normally would, to load your MS Forms response data into Power BI.
What do you think?
If you liked this article, let me what you think by filling in a response on the OneDrive MS Form, or drop a comment below. If you have a better approach, I would love to hear about it.
Wow, fantastic blog layout! How long have you been blogging
for? you make blogging look easy. The overall look of your website is fantastic, let alone the
content!
Your point of view caught my eye and was very interesting. Thanks. I have a question for you.
like you wrote the book in it or something
my website : Papa4d2
I recently tried https://killakush.com/product/sativa-thca-exotic-flower-3-5g-7g/ , and I’m absolutely impressed with the quality. The effects were mild, calming, and literally what I was hoping for. The contrast of options also allowed me to find something flawless in the direction of both relaxing evenings and fecund days. Definitely commend in favour of anyone seeking inordinate results!
Thanks Jason for that.
I followed your steps and it works.
However, is there a way of automating the process? Otherwise you still need to open the excel to refresh survey data, then click in Refresh button in power bi and publish refreshed report.
Many thanks
Hi Gabriela,
There shouldn’t be a need to refresh the Excel file manually. The file should be updated every time a new response is entered into the form.
Which connection did you use?
1. Sync’d local folder
2. SharePoint folder
3. Web Connector
I have since found that OneDrive can be a bit flaky, and doesn’t always keep the files up to date, so I now always recommend using one of the cloud-based connections.
If this is the only data source in your report, and you want to avoid using a gateway, then either SharePoint.Files or SharePoint.Contents will work fine.
If however you are opting for the Web Connector, then just make sure you change the connector from Web.BrowserContents to Web.Contents:
Web.BrowserContents – Returns the HTML for the specified URL, as viewed by a web browser – this is not a cloud solution, and therefore requires a gateway.
Web.Contents – Returns the contents downloaded from the URL as binary – this is a cloud solution and therefore doesn’t require a gateway.
Hi,
At the beginning of this blog, you warned us to not try to manually manipulate the Excel table ourself. If I need to do some transformations in the Excel Table (I have an SPSS code that I need to adapt in Excel, without using SPSS), is it possible for me to do it?
Thank you in advance!
Hi Sarah,
It depends what you mean by adapt an SPSS code in excel.
If you are transforming the Excel code, then you can do that in Power Query as you load the data into Power BI.
If you need to manually adjust the data for individual records, then you can modify the spreadsheet, but the changes will not be reflected in the Microsoft Forms Responses.
A colleague has set up a Form – Quiz, is there a way to use Power BI to report on Quiz results ?
I recommend you read this https://www.daxpatterns.com/survey/
I have set up power automate to be triggered by the form being submitted which can then save that data to an excel file of your choice. Then connect to power BI in the usual way. ( you can send the forms data to SharePoint or SQL or all of them at the same time if you want. )
Hi,
I tried both ways and in both cases, I get to name the Excel file, than I am redirected to MS Forms and I have to create a new form that is not attached to the Excel file in OneDrive. I do not see any option to get the Excel file attached to the new Form…
Can you tell me precisely what you do after you name your Excel file?
Thank you.
Hi So,
Apologies for overlooking a critical step from the walkthrough.
Once you have built your form, simply click on the Responses tab at the top (just next to the Questions tab), that will then take you to where the Download to Excel option is.
I will amend the blog now to include this step, so that it is clear.
Jason
Yes. I did that…. But it is not linked at all to OneDrive. It is an independant Excel Worksheet. So I get 2 Excel files. One in OneDrive that actually does nothing (it is being created when I create the form but then it is not linked to the form) and the other one in the forms that is a download, independant from OneDrive…
Nevermind my last comment. When I tried it today, it worked. Could it be that Im using a French version and that the roll out of this functionnality was just launched in the French version?
I’m not convinced it is a version issue. I have tried to do this a few times myself and it hasn’t worked. I think it is the nuances of exactly what to do to get it to work. There are many ways, and only the exact steps work (in my experience).
What I do is, from the ms form that loads a sharePoint list, this list allows us to add a functional workflow, the list is loaded from the form via power automate. Power bi is linked directly to that sharepoint list for reporting. Simple… no human intervention at all once set up, once you’ve set up one list it takes no time to duplicate
Thanks Andrew. Yes, that is another way (a good way) to do it too. Of course you need Power Automate and the skills to do it. Having said that, anything like this that can help you get new skills that can help you down the track is worth pursuing.