There are some valid reasons why you may need to change the names of all the columns in a table for use in Power BI. It is of course possible to change each column name by editing it manually, but what I am going to show you today is changing the names of all the columns in a table at once using the ‘M’ language in Power Query. The main point of this article is “how” I used M and Power Query to make this change, however it is useful to first understand the common use case.
Two Calendar Tables
It can be a common requirement to do analysis of orders and deliveries over time. If you want to see results in a matrix highlighting orders taken in one year and delivered in a different year, you must have 2 calendar tables – an inactive relationship will not work.
In the image below I have such a matrix set up. The order year is coming from one calendar table and the delivery year is coming from a second calendar table.
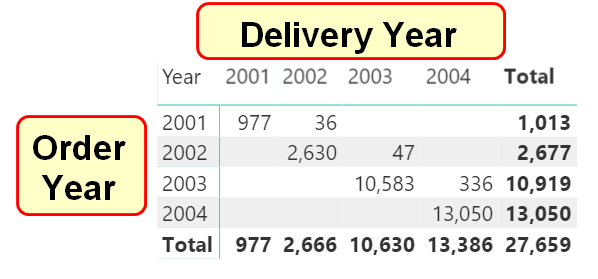
When you are using a matrix like this, it can be difficult to tell which “Year” column is coming from which table, as shown below.
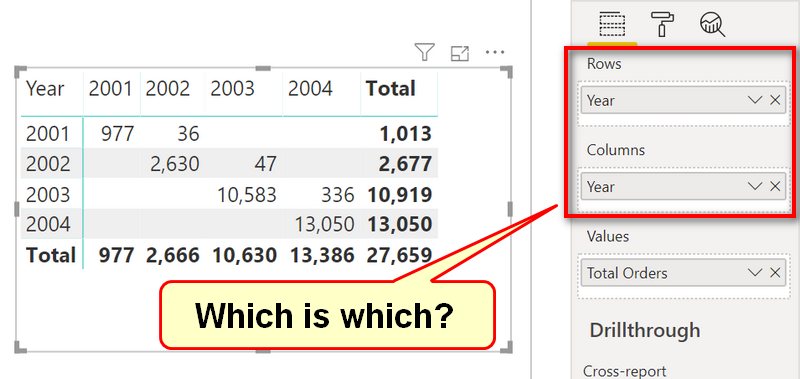
One solution to this problem is to rename all the columns in each table by pre-pending Order or Delivery to the front of the existing column names. Once that is done, it is much clearer which column is which.

In my video this week, I shown you 2 ways to rename all the columns in a table.

Method 1: Renaming Columns in Table Hacking the ‘M’ Code
These are the steps I used to hack the ‘M’ code in Power Query to rename all the columns.
- Manually change a couple of column names using the UI
- Find the List of Lists in the M Code. {{“Oldname1”, “Newname1”}, {“Oldname2”, “Newname2”}}
- Build your own List of Lists using either Excel and or the techniques I show in the video.
- Replace the original list of lists with the new list of lists.
Method 2: Renaming Columns in Table using ‘M’ Functions
This is a straightforward approach calling a specific function. I used the ‘M’ function “Table.TransformColumnNames” to add a prefix “Del ” to the existing column names. With this method you can do the same transformation on every column.
Watch the Video to Learn
I recorded a walk through of both methods outlined above in the video below. You will also learn how I use the user interface (UI) to learn more about the M Language.
Learn Power Query Tips and Techniques
Want to learn more of such Power Query tips and techniques? You can learn by enrolling to my Power Query Online Training. It is a self-paced course that has 7.5 hours of video content, worked out examples, and course material for you to practice your new skills.
I don’t think the title of your article matches the content lol. Just kidding, mainly because I had some doubts after reading the article.
Thank you so much!! Was looking for this exact solution.
I’m a little late to the party but I found this extremely helpful. I have your latest book and I’m working my way through. Thanks!
Great stuff; however, your matrix values were wrong at the end. They were the same year over year.
Greatly appreciated!
Amazing. Thanks. It is so useful.
Hi Matt,
How to add suffix to all column names in power query? Thanks.
Did you watch the video? The difference between prefix and suffix is trivial in the context of the video.
Hi! Thanks for this, I keep discovering new things every day in power bi.
I already have the list of the columns names in excel and the correspondent “new name” in the same file. However these new names are not a modification of the old names, these are just different (e.g. “extremely long old name with numbers and signs” Vs “simple and short new name”). How could I change the whole set of names (+500 columns)?? Thanks so much!!!
If you already have a table of “from/to” column names in Excel, simply load this Excel table, merge with the source data on the “from” column, left outer join. Then expand the new “to” column, and delete the original column from the source.
Hi,
Thanks Matt. This is really useful. For me I used the merge, after creating the list with a flat file, to change all my columns
Thanks Matt. This is really useful.
I immediately found a use for this – thank you!
Didn’t use your example exactly, but this gave me ideas where to look to edit the M code so I could replace multiple ‘Rename column’ steps with one. I was creating an import file where I had to add a ton of new columns with either ‘Y’ or ‘N’ values to fill in flag fields. I created one column with ‘NNNN’ then split it by each character to create the right number of columns, but then I needed to rename each column. I had all the column names in Excel so I had to just do a few steps there to make them into a list and then paste into the Split columns step instead of ‘Custom.1, Custom.2, etc’ that generates for the new column names.
I would also be interested in a post about List.Zip, that looks like something I could use but not quite sure how to use it…
Thanks for sharing Kerry. I agree with you, and this is my philosophy when learning M – if you have a go, it is remarkable what you can learn and how you can use those skills. I have had List.Zip on my “list” of things to blog about for a while. I will definitely get to that in the future – thanks for the suggestion.
Matt, at the end of the video it seems data is not sliced, have you noticed this?
This is really useful. I had a similar situation except that I had to change the name of the names instead adding a suffix. I used List.Zip to do that- it was a trick I found on youtube (forgot who it was unfortunately)
Yes, I will probably do a follow up blog showing List.Zip
HOLA MATT! Muchas gracias.
Nice tips! Thank you for the video.
Hi Matt,
Thanks for this video and my first powerBI material(supercharge powerBI),
it is possible that I might not under stand this problem exactly.
will the following method work?
use header as fist row
transpose
add a custom column : “Del ” + column1
move the newly created custom column to the beginning
remove column1
transpose
Regards
Nithyanandam
Yes, your method will work, but consider if your table has 1 million rows. When you transform the table, you will have 1 million columns. I don’t know what performance would be like in this scenario. But regardless, what ever approach works for you is good.
Got it, thanks Matt.