I have written quite a few articles about Tabular Editor over the last few years. I recently started using Tabular Editor 3, and I absolutely love it. Buying this product is one of the easiest ways you can significantly improve your Power BI Data Modelling productivity. For US$100 per year for the Desktop version (which will suit most business users), you will likely hit payback in the first month. Some of they key features I love (compared with the free version) are covered in this article here. And there is a new killer feature rumoured to be released this month – DAX debugging tools. DAX Debugging sounds amazing and will make this a must have product for everyone (if it’s not already so).
Running Scripts in Tabular Editor 3
Today I am talking about Macros in Tabular Editor 3. This is a new name for an old feature. In Tabular Editor 2, this feature is called Advanced Scripting (a term I actually prefer, but oh well). I think one reason for the name change is there are now multiple types of scripting, including the new DAX scripting feature (I covered that as a key feature I love in the article linked above).
To create a macro, you first have to create a script. I am using Adventure Works for this demo, open in Power BI Desktop. From there I launched Tabular Editor 3.

Once in Tabular Editor, click on the New C# Script button shown below.

As you can probably guess, the TE Macros use C# as the language. I am no where near an expert (not even a beginner, actually), but if you have done a bit of VBA or other programming, you will probably be able to work it out with the help of some sample scripts.
For this article, I am going to use the “Create Measures from Columns” sample script provided below.
// Creates a SUM measure for every currently selected column and hide the column.
foreach(var c in Selected.Columns)
{
var newMeasure = c.Table.AddMeasure(
"Sum of " + c.Name, // Name
"SUM(" + c.DaxObjectFullName + ")" // DAX expression
);

// Set the format string on the new measure:
newMeasure.FormatString = "0.00";

// Provide some documentation:
newMeasure.Description = "This measure is the sum of column " + c.DaxObjectFullName;

// Hide the base column:
c.IsHidden = true;
}
I copied this script above and pasted it into the C# Script window as shown below.

This script can now be run by clicking Run Script (1 above).
As you may be able to deduce from the code line 2, this script runs over selected columns. If you look at the code in full, you may realise for each selected column, it
- Creates a new measure
- Sets the format string
- Gives it a description
- Hides the column
To run the script, just select as many columns as you like (I have 7 selected below), and then run the script.

After Running the Script, the new measures are visible in the TOM Explorer as shown below. Note the columns are now hidden.

After saving to the connected DB (shown below).

Everything is reflected in Power BI Desktop.

Turning Scripts into Macros
Cutting and pasting scripts can work, but for useful scripts it is worthwhile turning the scripts into Macros. To do that, click on the “save as macro” button shown below

Give the macro a name, and click OK. Note below that the Macro context “Column” is selected. This was on by default and it tells the Macro engine that this script should be available from the context menu related to columns, and also that a column must be selected to run the script.

After clicking OK, the script has been saved. To run the script, just select one or more columns in the TOM Explorer (in this case, shown as 1 below), select Macros (2) and then choose the macro to run.
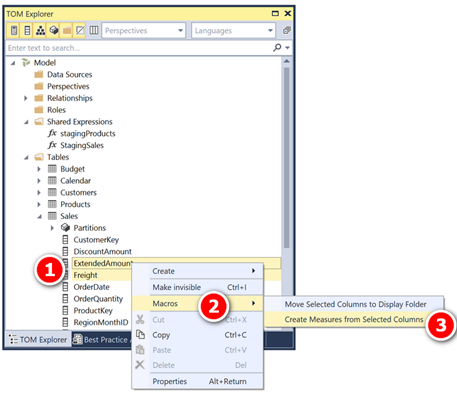
You can see above that I have another script to move columns into display folders. Here is that script if you are interested.
foreach(var column in Selected.Columns) {
column.DisplayFolder = "test";
}
Editing Macros
Once you have created your macros, you can edit them again. Just go to the TOM Explorer (1) and select the Macros tab (2).

You can just double click on the ID of the Macro you want to edit.

Make the changes in the C# Script window, then click the “Edit Macro” button to save the changes (shown below).

More Useful Scripts.
You can find a lot more useful scripts in the TE2 documentation here.
I don’t think the title of your article matches the content lol. Just kidding, mainly because I had some doubts after reading the article.
Using Macros in Tabular Editor 3
Macros in Tabular Editor 3 allow you to automate repetitive tasks and enhance productivity.
You can write C# scripts to create calculated columns, measures, or apply formatting across multiple objects.
Ideal for bulk editing, metadata management, and model optimization.
Use the Advanced Scripting pane to write and run your macros efficiently.
Great for developers working with large tabular models in Power BI or SSAS.
Using Macros in Tabular Editor 3**
Macros in Tabular Editor 3 allow you to automate repetitive tasks and enhance productivity.
You can write C# scripts to create calculated columns, measures, or apply formatting across multiple objects.
Ideal for bulk editing, metadata management, and model optimization.
Use the Advanced Scripting pane to write and run your macros efficiently.
Great for developers working with large tabular models in Power BI or SSAS.
Thank you for this article, very helpful!!
I’ve just recently started doing scripts in Tabular Editor as well. The syntax takes some getting used to. Here is a good sample that has been very helpful to me. It works with a lot of different objects and is a great starting point. https://github.com/m-kovalsky/ModelAutoBuild/blob/master/ModelAutoBuild/ModelAutoBuild.cs
Wow, that’s some script. What does it do? It looks like it might build a new model from an Excel data source, or metadata
Thanks!
I did not know that the macros are the same as advanced scripts in the earlier version. I saved some of those to notepad files but saving them as macros are way better.
Here’s an insight – neither did I until this morning 🙂